Friday, May 6, 2016

ERROR: Failed to verify authenticode signature - ConfigMgr (2012, 1511, 1602) Pre-requisite downloads

Hey Guys.. Hope you are all good.. This time I am bringing you all a simple fix to an annoying issue that most of us have faced while trying to upgrade / Install ConfigMgr. Yes, this is about the fix to annoying "Failed to verify authenticode signature" error while downloading setup pre-req's.  lets get into that quickly


Error Description

While you are downloading setup pre-requisites for ConfigMgr installation either via setup wizard or via by running setupdl.exe, the download will fail with the below error message


The corresponding error message in ConfigMgrsetup.log would read like this

INFO: Verifying signature for file 'C:\TEMP\Download\sqlncli.msi'    Configuration Manager Setup    06.05.2016 10:11:57    11032 (0x2B18)
ERROR: Failed to verify 'C:\TEMP\Download\sqlncli.msi' authenticode signature.    Configuration Manager Setup    06.05.2016 10:11:57    11032 (0x2B18)
ERROR: File signature check failed for C:\TEMP\Download\sqlncli.msi    Configuration Manager Setup    06.05.2016 10:11:57    11032 (0x2B18)
INFO: Downloaded file 'C:\TEMP\Download\sqlncli.msi' is not valid    Configuration Manager Setup    06.05.2016 10:11:57    11032 (0x2B18)
ERROR: Failed to download required file    Configuration Manager Setup    06.05.2016 10:11:57    11032 (0x2B18)
Solution

Many of us would think that there is something wrong with file which is downloaded or blame the hardware or software firewall for ruining the downloaded file. But in reality this is nothing to do with your firewall and stuff.

You receive this error message because of an IE setting "Check for publisher's certificate revocation" under Advanced settings.


We need to disable temporarily to get this download working. If you are allowed you could directly remove the check mark. If if you are same as me and not allowed to change this settings here, you would have to do it through registry.

Open Regedit.exe and navigate to HKEY_CURRENT_USER\Software\Microsoft\Windows\CurrentVersion\WinTrust\Trust Providers\Software Publishing and Change Value “State”  to 146944 Decimal or 0x00023e00 Hexadecimal.. As shown below.


Now, the "Check for publisher's certificate revocation" would be disabled and your download should succeed.

Hope this helps, Happy upgrading ConfigMgr :-)

 S A Delphin

Friday, April 29, 2016

Migrating to ConfigMgr Current Branch - Moving SUP (WSUS) to server 2012 R2

Hey guys. This is the second post in the series "Migrating to ConfigMgr Current Branch". In my first post we talked about moving MP to a server 2012 R2 and in this post we will talk about moving SUP to server 2012 R2. I wanted to index all the posts in this series to make the navigation easy for you guys.. Here it is

Migrating to ConfigMgr Current Branch

1.Migrating to ConfigMgr Current Branch - Migrating MP to server 2012 R2

2.Migrating to ConfigMgr Current Branch - Moving SUP (WSUS) to server 2012 R2


 Lets get into this,  The ConfigMgr 2012 instance I support has 2 SUP role instance on 2 different servers. Both the WSUS instances on the SUP's shares same SQL DB which resides under ConfigMgr DB instance and WSUS shared Content share which is hosted in a file share. Since both of WSUS uses same DB & Content share, and I really cant touch the DB as it is prod instance, I had to take the below approach to complete this task.

(new server 2012 R2 servers will be called sup2012_1 and sup2012_2  from now on in this post)

  • Install WSUS with WID (Windows internal Database) in sup2012_1
  • Detach the WID DB from sup2012_1 and attach it with ConfigMgr SQL instance with name different than default SUSDB(In my case, I had that named as SUSDB_<SiteCode>)
  • Configure sup2012_1 to use attached sql database
  • Install WSUS in sup2012_2 and configure to use the same DB and Content share used by sup2012_1
  • Configure SUP role in both sup2012 servers and initiate WSUS sync.
  • Perform functionality and availability tests
  • remove SUP role from server 2008 R2
Lets see each phase in detail.

Install WSUS with WID (Windows Internal database) in sup2012_1

  • Login to the server sup2012_1 and make sure firewall is turned off or necessary firewall rules are created allowing siteserver and sup2012_1 to communicate
  • Add the computer account of site server as a local admin in sup2012_1
  • If you have additional drive to install ConfigMgr component and don't want SCCM to get installed in C drive, create NO_SMS_ON_DRIVE.SMS in the root of C drive, so that the drive will be untouched.
  • Create a Share folder in a file share for WSUS content and add provide full control for everyone. (\\FileServer\ShareFolder)
  • Open an elevated PowerShell Console and execute the below command to install WSUS and required IIS features
Install-WindowsFeature -Name UpdateServices -IncludeManagementTools
  • Once the command completed successfully (Ignore the warning message about post installation configuration) execute the below command to perform post installation configurations
 "C:\Program Files\Update Services\Tools\wsusutil.exe" postinstall CONTENT_DIR="\\FileServer\ShareFolder"
  • After the post installation configurations are completed,  Launch IIS management console and navigate to Sites->WSUS Administration, right click on Content, select Manage Virtual directory and select Advance settings.
  • In the advance setting properties, Make sure Physical path starts with "\\", If not add as seen in the below screenshot


  •  Restart W3SVC and WSUS services
  • Launch WSUS administration console to make sure that the console launches without any error.(DO NOT CHANGE ANY CONFIGURATIONS THROUGH CONSOLE)

 Migrate from WID to Remote SQL (Server 2012 WSUS)

  • Download Microsoft ODBC Driver 11 for SQL Server and SQLCMD from the below links respectively.
https://www.microsoft.com/en-us/download/details.aspx?id=36434 
https://www.microsoft.com/en-us/download/details.aspx?id=36433
  • Install ODBC driver followed by SQLCMD in sup2012_1 server by following installation wizards 
  • stop W3SVC and WSUS services
  • open elevated command prompt and execute following commands to provision and detach WSUS DB from WID
sqlcmd -S \\.\pipe\MICROSOFT##WID\tsql\query
use master
alter database SUSDB set single_user with rollback immediate
go
sp_detach_db SUSDB
go
  • Once the above step completed successfully, Navigate to C:\Windows\WID\Data and copy the susdb.mdf to a shared location.
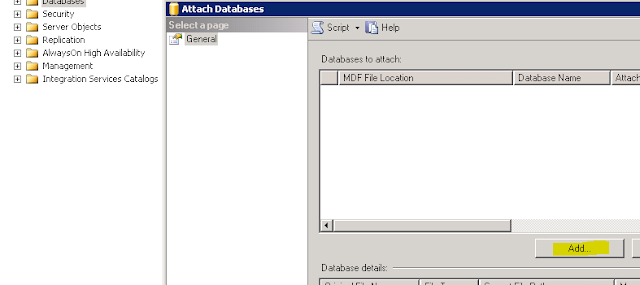
  • Login to SQL server where your existing SUSDB is hosted, Launch SSMS (SQL server management studio), connect to DB instance and attach the copied susdb.mdf file with name SUSDB_<SiteCode> by going through attach DB wizard
  • Once the DB is successfully attached, Login to SUP server(sup2012_1) with admin privileges, Navigate to HKLM\SOFTWARE\Microsoft\UpdateServices\Server\Setup in registry editor and change the values as shown below
SQLServerName: <SQL server Name>\<Instance Name>
SqlDatabaseName: SUSDB_<SiteCode>
ContentDir: \\FileServer\ShareFolder
  • Start W3SVC and WSUS service
  • Laucn WSUS admin console to make sure it is able to connect to DB

Install and Configure WSUS in sup2012_2(Replication Partner)

  • Login to the server sup2012_2 and make sure firewall is turned off or necessary firewall rules are created allowing siteserver and sup2012_2 to communicate
  • Add the computer account of site server as a local admin in sup2012_2
  • If you have additional drive to install ConfigMgr component and don't want SCCM to get installed in C drive, create NO_SMS_ON_DRIVE.SMS in the root of C drive, so that the drive will be untouched.
  • Open an elevated Powershell Console and execute the below command to install WSUS and required IIS features (Without DB)
install-windowsfeature -name updateservices-services -includemanagementtools
  • Open registry editor, navigate to  HKLM\SOFTWARE\Microsoft\UpdateServices\Server\Setup and change the values as shown below
    SQLServerName: <SQL server Name>\<Instance Name>
    SqlDatabaseName: SUSDB_<SiteCode>
    ContentDir: \\FileServer\ShareFolder
( Exact same values as in sup2012_1 server)
  • In elevated PowerShell console execute below command to perform post installation configurations
 "C:\Program Files\Update Services\Tools\wsusutil.exe" postinstall CONTENT_DIR="\\FileServer\ShareFolder"
  • Once the post installation configurations are completed,  Launch IIS management console and navigate to Sites->WSUS Administration, right click on Content, select Manage Virtual directory and select Advance settings.
  • In the advance setting properties, Make sure Physical path starts with "\\", If not add as seen in the below screenshot


  • Restart W3SVC and WSUS services.
  • Launch WSUS administration console to make sure that the console launches without any error.(DO NOT CHANGE ANY CONFIGURATIONS THROUGH CONSOLE)


Install SUP role in both servers (sup2012_1 & sup2012_2)


  • Connect to ConfigMgr site through PowerShell, by selecting "Connect via Windows PowerShell" from Console file menu

  • Execute the below power shell command to add server2012 as a sitesystem in your ConfigMgr site (If they are not already)
New-CMSiteSystemServer -ServerName "sup2012_1.<DomainName>.<Com>"  -SiteCode "<SiteCode>"
  • On successful completion of the above, execute the below power shell command to add sup2012_1 as a SUP
Add-CMSoftwareUpdatePoint -SiteSystemServerName  "sup2012_1.<DomainName>.<Com>"  -SiteCode "<SiteCode>" -ClientConnectionType Intranet -WsusiisPort "8530" -WsusiissslPort "8531" -Verbose
  • Go through supsetup.log in the installation directory and make sure the SUP installation succeeded.
  • Once the installation succeeded, Navigate to \Administration\Overview\Site Configuration\Servers and Site System Roles in ConfigMgr console, select sup2012_1, right click on SUP role to see the properties. Make sure all the options you need are selected and configured.
  • Go through wcm.log in site server and make sure the configuration completed without any errors. But if you happen to receive the below error in WCM, it can safely be ignored as this is known behaviour in ConfigMgr 2012 R2 SP2
Failed to create assembly name object for Microsoft.UpdateServices.Administration. Error = 0x80131701.    SMS_WSUS_CONFIGURATION_MANAGER    29.04.2016 09:09:07    11840 (0x2E40)
  • Once all are green, initiate an update sync in ConfigMgr console and observe the outcome.
  • Follow the above procedure to install SUP role in sup2012_2 and initiate a sync to make sure everything is Ok.

Known Errors

In this section we will talk about known errors while configuring a server 2012 R2 as SUP in ConfigMgr environment

Error1 - WSUS app pool crash

 When you configure a server 2012 R2 WSUS as ConfigMgr SUP,  WSUS app will crash while the clients starts using that SUP and The console will not connect WSUS with the below messages in event viewer.

Event ID:      12052
Task Category: 9
Level:         Error
Description:
The DSS Authentication Web Service is not working.

Event ID:      12042
Task Category: 9
Level:         Error
Description:
The SimpleAuth Web Service is not working.

Event ID:      12022
Task Category: 9
Level:         Error
Description:
The Client Web Service is not working.

Event ID:      12032
Task Category: 9
Level:         Error
Description:
The Server Synchronization Web Service is not working.

Event ID:      12012
Task Category: 9
Level:         Error
Description:
The API Remoting Web Service is not working.

Event ID:      12002
Task Category: 9
Level:         Error
The Reporting Web Service is not working.

Event ID:      13042
Task Category: 6
Level:         Error
Description:
Self-update is not working.

Fix

To fix we need to change certain values at the IIS level for WSUS website. To do that,
  • Launch IIS management console, Navigate to Application Pools, Right click on WSUS Pool and go to advance properties.
  •  In the advance settings properties change the Queue length to 50000 as shown in the below screenshot
 

  • After doing this change, restart W3SVC and WSUS services.

 Functionality & Availability tests

  • Launch ConfigMgr Admin console Navigate to Monitoring\Overview\Software Update Point Synchronization Status to verify that the newly Installed SUP synchronize without any issues
  • Additionally go through wsusctrl.log, wcm.log, wsyncmgr.log to make sure that there are no errors in SUP operations
  • Identify a group of test clients and make them report to newly installed SUP by changing local group polcy configuration. Launch gpedit.msc, navigate to Computer Configuration -> Administrative templates -> Windows Components -> Windows Update. Edit the policy "Specify intranet Microsoft Update service location" to type in your server name as in the below image.

  • Create a test Update group, Deployment package and deployment to make sure the test clients successfully complete the scan against newly installed SUP, download the content, Install the updates and perform post validation scans.
Remove server 2012 R2 SUP

 This is pretty much straight forward. The upstream SUP must be removed at last after all of it's downstream SUPs are removed.
  • Login to siteserver, In Admin console navigate to Administration\Overview\Site Configuration\Servers and Site System Roles, select the server 2008 R2 SUP in the right pane
  • Right click on the Software Update point role, and click on Remove Role
(While removing the upstream SUP it will ask you select new upstream server. From the drop down menu, select one of newly installed SUPs )
  • Supsetup.log to verify successful De-installation SUP role
  • Navigate to Administration\Overview\Site Configuration\Servers and Site System Roles, right client on the server 2008 r2 site system and select Delete.

 Hope this post would help you when you plan to move your SUP role from server 2008 R2 to server 2012 R2. I know this is a lengthy post and I tried my level best to explain without including too much screenshots.If you have any questions or suggestion, Please leave a comment. i will try to answer them. :-)

S A Delphin

Thursday, April 21, 2016

Migrating to ConfigMgr Current Branch - Migrating MP to server 2012 R2

Hey guys.. Glad to meet all of you with another series (Migrating to ConfigMgr CB). In my client's environment we fixed ConfigMgr 1602 as the version to be migrated to and currently we are preparing our infrastructure by replacing server 2008 R2 site systems with server 2012 R2 and performing compatibility & stability tests in ConfigMgr 1602 test environment in parallel. As explained in one of my previous posts, ConfigMgr CB will not support server 2008 R2 servers as site systems / site servers after this December. More details here
Did you know that you should breakup with server 2008 R2

Meanwhile some of my friends approached me asking my suggestion on the migration to ConfigMgr CB in the infrastructure they support. So, I thought it would be really cool if I can write a blog series on that. here I am, this series will have detailed procedure to migrate all the site systems (MP, DP, SUP, RP etc) to server 2012 R2 as preparing to ConfigMgr CB upgrade and I will share all the issues and experience I came across in my infrastructure. Without further adu, lets get started.

Migrating MP to server 2012 R2

 I wouldn't call this a migration but introducing new server 2012 MP and removing old one. The Plan is as follows

  1. Prepare server 2012 R2 server
  2. Install MP on server 2012 R2
  3. Make sure it works and Remove the traces of Server 2008 R2 MP in deployment objects
  4. Remove MP role from Server 2008 R2 servers

lets see those steps in detail

Prepare server 2012 R2 server (server2012)

  1. Make sure firewall is turned off or necessary firewall rules are created allowing siteserver and server2012 to communicate
  2. Add the computer account of site server as a local admin in Server2012
  3. If you have additional drive to install ConfigMgr component and don't want SCCM to get installed in C drive, create NO_SMS_ON_DRIVE.SMS in the root of C drive, so that the drive will be untouched.
  4. Install below server components which are mandatory for ConfigMgr MP
- .NET Framework 4
- BITS Server Extensions (and auto selected options)
- IIS
   Application Development >> ISAPI Extensions
   Security >> Windows Authentication
   IIS 6 Management Compatibility >> IIS 6 Metabase Compatibility
   IIS 6 Management Compatibility >> IIS 6 WMI Compatibility
      5. Restart the server2012 as needed
     6. Navigate to DotNet install location (By default it's C:\Windows\Microsoft.NET\Framework64\v4.0.XXXXX), edit the files regsvcs.exe.config ando InstallUtil.exe.cnfig to add the below lines right after </startup>

<runtime>     
    <loadFromRemoteSources enabled="true"/>
</runtime>
 and the  file should look like the following screenshot


If you do not do this, the BGB component installation in server2012 will keep failing with a DotNet Error

 Install MP role in Server2012
  • Connect to ConfigMgr site through PowerShell, by selecting "Connect via Windows PowerShell" from Console file menu
  •   Execute the below power shell command to add server2012 as a sitesystem in your ConfigMgr site
New-CMSiteSystemServer -ServerName "Server2012.<DomainName>.<Com>"  -SiteCode "<SiteCode>"
  • On successful completion of the above, execute the below power shell command to add server2012 as a MP
Add-CMManagementPoint –SiteSystemServerName "Server2012.<DomainName>.<Com>" –SiteCode "<SiteCode>"
  •  Go through MPcontrol.log in the installation directory and make sure the MP installation succeeded.
  • Once the installation succeeded, Navigate to \Administration\Overview\Site Configuration\Servers and Site System Roles in ConfigMgr console, select the new site system, right click on MP role to see the properties. Make sure all the options you need are selected and configured.
Post Configuration
  • Go through mpcontrol.log to confirm that the newly installed MP is responding to client communications
  • Use MPcert and MPlist URL from a test client to verify that the MP is reachable to clients

http://<Site_system_name>/sms_mp/.sms_aut?mplist
 http://<Site_system_name>/sms_mp/.sms_aut?mpcert
  •  If you have published all your MP's in DNS, remove the old entries and add the entries for server2012 MP
  • Identify Task Sequences which uses old MP's in their ConfigMgr client installation switches and edit them to reflect the new server2012 MP
  • Make sure to remove the traces of OLD MP's from all other deployment object so that removing them will not stop anything from working.
Remove OLD MP
  • Navigate to \Administration\Overview\Site Configuration\Servers and Site System Roles in ConfigMgr console, select server 2008 site system which hosts MP role, right click on MP role and select remove.
  • Monitor mpsetup.log to ensure successful removal of MP.
That's all you need to do, If you have MP's with replicated DB for special requirements, build server2012 MP in the same way with different SQL DB and remove the old one.


Hope this article helps and this is the first post in the series. I will come up with a post which explains  Upgrading your SUP while you have 2008 R2 replicated WSUS which uses same DB instance as SUP's.

Complete index of this series,

1.Migrating to ConfigMgr Current Branch - Migrating MP to server 2012 R2

2.Migrating to ConfigMgr Current Branch - Moving SUP (WSUS) to server 2012 R2

S A Delphin

Monday, March 14, 2016

How does Client Online status in ConfigMgr 1602 work

Hey guys, you all excited to get your hands dirty with COnfigMgr 1602 ? Well, I was able to get the upgrade package by running the powershell script(EnableupdateRing Powershell Script) available here

Right after running the powershell script I launched Configuration Manager Service Manager and restarted SMS_DMP_Downloader under components. Then the upgrade package was available under Administration\Overview\Cloud Services\Updates and Servicing . Right clicked on it to run the pre-requisite check and started upgrade through right click menu. I am not going to talk about the upgrade process in detail, since there are many article explaining that in detail.

One cool feature that I noticed is, we could see if a computer is online or offline in console. There is this green check mark on the device icon if the client is online. The Icon for offline computers remains the same.


I was really surprised to see this change for real and It also made me to think that if the client are going to send it status to MP frequently and ConfigMgr is to process all these request and store is in DB, It would actually increase the load on both the network and site server / systems. So I decided to check if there are places where this communication activity is recorded. I found quite interesting stuff there..

Quoted from Microsoft post

A new status for clients is available for monitoring if a computer is online or not. A computer is considered online if it is connected to it's assigned management point. To indicate that the computer is online, the client sends ping-like messages to the management point. If the management point doesn't receive a message after 5 minutes, the client is considered offline.

 It looks like the client's BGB agent's keep alive messages are used in order to define if a client is online or not.


The keep alive messages are then processed by BGB server to create a Delta report on the client Online status to be processed further.


The Delta file is processed and Online status of each client is stored in table BGB_ResStatus . If you want to see that yourself, try this query in your SQL management studio

SELECT TOP 1000 [ResourceID]
      ,[OnlineStatus]
      ,[ServerID]
      ,[LastOnlineTime]
      ,[ChannelType]
      ,[LastOfflineTime]
  FROM [CM_<SiteCode>].[dbo].[BGB_ResStatus]

 The above query gave me the following result. The column Online status defines whether a computer is online or not.

I investigated everything I wanted to know about the new client online status feature and the only thing I want to investigate now is, What if I want to disable this and reduce the load on the Network as well as site servers/ systems ?

I still dont have answer for that question and I will try to find that out soon. So, If you are planning to move to ConfigMgr 1602, knowing how this works comes in handy at times.

Hope this helps
S A Delphin

Tuesday, March 8, 2016

You cant get away! | Win7, 8.1 to go extinct | New processors will only work with Win10 - Microsoft

Yes, It is true. In 18 months Windows 10 will replace all of his sisters. Microsoft anounced that only Windows 10 will support the next generation procesors. Next generation processors, including Intel's "Kaby Lake", Qualcomm's 8996 (branded as Snapdragon 820), and AMD's "Bristol Ridge" APUs (which will use the company's Excavator architecture, not its brand new Zen arch) will only be supported on Windows 10.

Also, Organization that runs Windows 7 / 8.1 on Intel 6th generation Core processor (SkyLake) are given time until17 July 2017 to upgrade to Windows 10. After July 2017, the most critical Windows 7 and Windows 8.1 security updates will be addressed for these configurations, and will be released if the update does not risk the reliability or compatibility of the Windows 7 and Windows 8.1 platform on other devices.

Read more here
http://windows.microsoft.com/en-gb/windows/skylake-support

 If your organization runs win 7 or 8.1 on Skylake processors, you only have time until July 2017. You sure wanna book mark the above link to frequently check the Skylake systems supported on Win 7 / 8.1, as this page will be frequently upgraded as and when hardware vendors releases new model.

 MIcrosoft is trying to justify this move by providing certain data points and they have re-defined their support policy. Below is a snippet from Microsof's blog post

We are particularly excited about the work we’ve done with Intel on their new 6th generation Intel Core processors (code named “Skylake”). Compared to Windows 7 PC’s, Skylake when combined with Windows 10, enables up to 30x better graphics and 3x the battery life – with the unmatched security of Credential Guard utilizing silicon supported virtualization. We and our partners are continuing to invest, innovate, and update to drive continued performance improvements across Windows 10 and Skylake devices.
 
With Windows 7 now in extended support, we are focused on our commitment to deliver security, reliability, and compatibility to our installed base on their current systems. Redesigning Windows 7 subsystems to embrace new generations of silicon would introduce churn into the Windows 7 code base, and would break this commitment.

Going forward, as new silicon generations are introduced, they will require the latest Windows platform at that time for support. This enables us to focus on deep integration between Windows and the silicon, while maintaining maximum reliability and compatibility with previous generations of platform and silicon. For example, Windows 10 will be the only supported Windows platform on Intel’s upcoming “Kaby Lake” silicon, Qualcomm’s upcoming “8996” silicon, and AMD’s upcoming “Bristol Ridge” silicon.

Read the entire post here
https://blogs.windows.com/windowsexperience/2016/01/15/windows-10-embracing-silicon-innovation/

All that being said, It's time for you to take this up with your organization and start planning the migration of Windows 10.


The redefined policy makes Microsoft's hardware partners happy since they no longer have to develop as many costly software updates for past versions of Windows. It also helps Microsoft push migrating to Windows 10. Microsoft already anounced that WIndows 10 is their final version of Windows. it's now a service, not a product, and this change better reflects that. There's only one current version of Windows, and while Microsoft will fulfill its legacy hardware obligations, it won't be expending resources to help users steer clear of its latest and greatest.

S A Delphin

Monday, February 29, 2016

Boot Image Properties are missing after R2 SP1 CU2 Upgrade

Hey guys. Happy to meet you with one of my recent experience again. I am really blessed to work for my client as I get to work on the latest version of the product. So the story goes like this, As soon as CU2 for ConfigMgr 2012 R2 SP1 is released, we started evaluating it and prepared our ConfigMgr infrastructures for the upgrade. The entire upgrade went successfully and started performing tests to ensure the functionality of ConfigMgr only to realize that the customization properties of all boot images are missing.

 As this is kind of common in infrastructure upgrade where the boot images are not updated yet, we updated all our boot images. But still no tabs!!

 We started looking out for other options, but none of them worked. We only had the option of reinstalling the ADK in site server left with us. But I wanna make sure that I took care of everything before doing that. So I created a thread to ask for other technet member's opinion on this.

Drivers tab is missing on Boot Image Properties

 I am glad that I opened that thread and Jason directed me to work around the SMS provider.

(get-wmiobject -class sms_providerLocation -namespace root\sms).machine

Running  above power shell command returned me 2 SMS providers, Where as we only have one SMS provider that sits on the site server itself. Probably the leftovers of previous SMS provider testing.

Now that I realized what needs to be done, I remove the left overs of the second SMS provider and voila!! the tabs are back again.

Hope this helps
S A Delphin

Tuesday, February 23, 2016

Did you know that you should breakup with server 2008 R2

 Hey Guys.. I am here with yet another exciting post about ConfigMgr current branch (1511). A month before we decided to install ConfigMgr 1511 in a test environment and evaluate the product to ensure that it suits our PROD infrastructure with all the other services connecting in.

 I was really stumbled when I found out about the depreciating features of ConfigMgr vNext (1511) while I was reading through the features and pre-requisites of it. Looks like we can not use Server 2008 / 2008 R2 as a site server / site system anymore. The support for these OS versions will be removed right after year from the release date of ConfigMgr 1511. This is the same for SQL 2008 R2 as DB as well.

Read more here https://technet.microsoft.com/en-us/library/mt210917.aspx

 But we have all our servers running server 2008 R2 and the only option available to to have ConfigMgr 1511 PROD is to perform a side by side migration from 2012 R2 Sp1 to ConfigMgr 1511 with server 2012 as site systems/site servers. But this is clearly not an option for us since we had a lot of objects to migrate and we really don't wanna mess with how things works now. 1511Since upgrading our PROD environment to ConfigMgr 1511  is one of the milestone for this year, We decided to look at other options to upgrade to 1511 without having to perform a side by side migration.

 Luckily we came up with a plan which does not involve a side by side migration.


This is how we are planning to perform the upgrade from ConfigMgr 2012 R2 SP1 to ConfigMgr 1511.
  1. First, we will build a ConfigMgr 1511 infrastructure on windows server 2012 R2
  2. Upgrade the existing ConfigMgr 2012 R2 SP1 to ConfigMgr 1511
  3. Perform "Migrating to new hardware" steps to migrate the infrastructure.
The above is just the outline of we are thinking and we are developing the plan into action. I will keep you guys posted on how it goes.

Update :  Since ConfigMgr Current Branch now supports in-place upgrade of site servers from 2008 R2 to 2012 R2, you could choose that approach as a simple and safe approach

 S A Delphin

Twitter Delicious Facebook Digg Stumbleupon Favorites More

 
Design by Free WordPress Themes | Bloggerized by Lasantha - Premium Blogger Themes | Bluehost Coupons