Showing posts with label Tricks and Tweaks. Show all posts

Wednesday, November 6, 2013

How to play MKV format videos in Sony Bravia LED TV or any other LED TV


  I recently bought Sony DAV TZ 215 DVD Home Theater System. But when i was running it for the first time i was really disappointed since it cant play MKV format videos. But all my HD movies are in MKV format.

  Later i found a way to make the HTS system play MKV formats with a little workaround. This workaround can be used for Sony Bravia and any other LED tv's

Let's see the procedure,


  1. Go to http://www.videohelp.com/tools/tsMuxeR and download txMuxer latest version and extract it on your computer.
  2. Double click on tsMuxerGUI.exe to open the tsMuxer
  3. In the Input tab click on add to add the mkv file you want to convert
  4. Select the output format as M2TS Muxing and change the video level if required
  5. Click on Start Muxing, the out file will be saved in the output directory and that can be changed.
  6. This process will take around 30 secs for 1Gb MKV file.
  7. Copy the output file to a USB and your sony device must play that video format.
The screenshot below will show the options available


MKV is a container and M2ts is also a container, hence there is no loss in quality while transforming.

Hope this helps...
Other Supported Models : Sony BRAVIA KDL-43W800C
                                                                                                                                           S A Delphin

Tuesday, July 24, 2012

"Disable failed No devices disabled" devcon.exe | How to disable devices from command prompt


 This article will help you in Disable or Enable devices from command prompt. And also this will discuss about the error u may likely to encounter.

It will be really good rite, when you can disconnect your modem or internet connection in one click after you are finished with it. This article will help you to do that.

First you need to have devcon.exe. An alternate to device manager which can be run through command prompt.

Download the devcon.exe from the below link

http://support.microsoft.com/kb/311272 

Once you downloaded the devcon exe file, extract  the exe and paste it inside c:\windows\system32 folder. That's it you are ready to run it. 

 I've read the above procedure in a blog, and wanted to try it.  But i was getting this message..

"
C:\Windows\system32>devcon disable *mouse*
HID\VID_04CA&PID_0030\7&3A7DF96F&0&0000                     : Disable failed
No devices disabled.
"

After some digging i found the the 64 bit version of devcon available to download form Microsoft website is not compatible for windows 7 64 bit. You will need to extract it from server 2003 64 bit dvd.

Once it's done it will work like a charm. I've extracted the 32 and 64 bit version devcon.exe from server 2003 dvd and uploaded it. You can download it from below links..

Devcon.exe 32 bit

Devcon.exe 64 bit


Hope this helps..
Techytipz

Friday, August 5, 2011

Allow standard user to change system date and time : How to change system date and time without admin privilege.


  Hey friends, In this post we will discuss about setting up permissions for a standard user to change system data and time in windows.
  Let see how we can do that..


   Login to your computer as ad administrator. Type secpol.msc in run and hit enter to open local security policy. Click on continue if UAC prompts...


  Expand local Policies>User right assignment, in the right pane double click on Change the system time to edit it.


  By default, Administrators and Local service will be having the permissions. To ad a standard user or a group, Click on add user or Group(marked as 1).  Then click on object type at the top right. Put a check mark on Groups if you want to add a group(marked as 2).

  Type Users and click on check names(marked a s 3). Once the group name is resolved, click on Ok in all opened windows to accept the change. You can even add a single user name if you don't want to add user group.

  That's it now login as a standard user, and you will be able to change the system data and time..

  You can even manage this security policy through GPO if you are inside a domain network. Need to edit your GPO as below.


Hope this will help you...

                                                                                                                                          Techytips

Tuesday, July 26, 2011

How to install vista and windows 7 OS using pen drives(Removable hdd)

 
  In my previous post we discussed about installing Windows XP using thumb drives. The post can be found here, http://delphintipz.blogspot.com/2011/07/how-to-install-xp-os-using-pendrive-or.html .

  In this post we will talk about installing Windows 7 and windows vista using thumb drives.


  To make your pen drive bootable you need to download and install the latest version of Ultra ISO , and you must have windows 7 or windows vista dvd image in .iso format. If you have a dvd with vista or Windows 7 you can make .iso image using ultra ISO...

  Open Ultra ISO application by clicking the shortcut(If you are using vista or windows 7 right click the shortcut and select run as administrator). Open your windows 7 or vista .iso dvd image through file menu of Ultra ISO.
  Once you opened the .iso image select Bootable>WriteDiskImage


  Select the USB drive you want to make it as bootable. Click format, and format the drive using ntfs partition. Then click on write to begin the process.

  Once the process is completed, you can remove the drive from your computer and start installing with that pen drive.

  Hope this helps...


                                                                                                                                    Techytips

Thursday, July 21, 2011

How to install XP OS using pendrive or removable HDD(No command prompt stuff)


  Always wanted to install OS using thumb drives. Just thought of sharing the procedure to install XP os using a pen drive.

  This post will help you to do that.

  The first step is to download a free application called WinSetupFromUSB_0-2-3 from any one of below link...

Server1
server2

Then install the application in your computer. Open the application (If you are using vista or windows 7 right click the shortcut and select run as administrator). This application can be used for 2003 server as well.


Read the warning message, You must not use FAT16 file system on thumb drives greater that 2 gb. Also if you format the drive using ntfs the installation time will be less.


   If you have xp CD, copy the content of that CD to a separate folder, and select that folder as your windows xp source.

   Select the usb drive you want to make it bootable if you plugged more than one usb drive.

   Don't touch the remaining things. Click go. Wait for it to complete.

  That's it. You are ready to go. Use the pen drive to install os.

    Hope this helps..

                                                                                                                                         Techytips

Monday, January 10, 2011

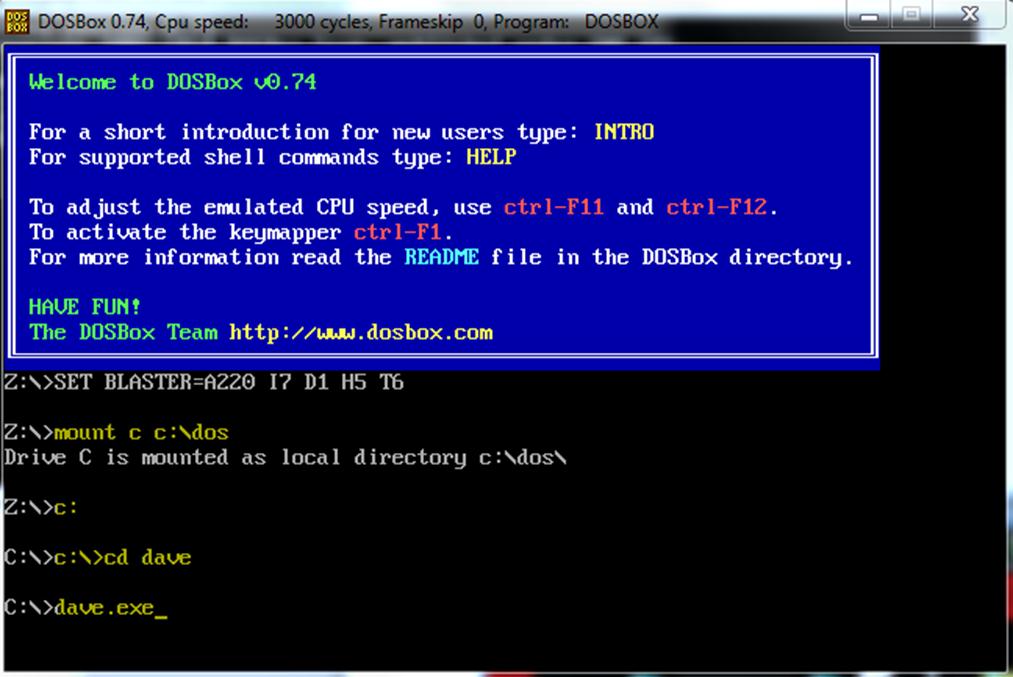
HOW TO RUN DANGEROUS DAVE AND OLD DOS GAME IN LATER VERSION OF WINDOWS(AFTER XP) "EX SHOWN HERE WIN 7 64 BIT"

STEP 1: DOWNLOAD DOS BOX (VER 0.74) http://www.dosbox.com/download.php?main=1 AND INSTALL. CLICK HERE TO DOWNLOAD FROM RAPIDSHARE


STEP 2 : DOWNLOAD DANGEROUS DAVE http://www.acid-play.com/download/dangerous-dave AND EXTRACT TO A FOLDER C:\DOS...

                CLICK HERE TO DOWNLOAD FROM RAPIDSHARE


STEP 3: RUN THE DOS BOX AND TYPE THE BELOW
                mount c c:\dos
                c:
                c:\>cd dave
    dave.exe
    PRESS ALT+ENTER FOR FULLSC REEN


Hope this helps..

                                                                                                                      Techytips

Friday, January 7, 2011

How to install printers in vista and windows7 without admin privileges. Allowin standard user to install printers in vista and windows 7 computers.


      In this article we will talk about installing a network printer shared by a print server in a computer without providing local administrator credential in a domain environment.

     By configuring Point and print restriction in group policy settings we can allow a standard user to install printers in a vista or windows computer.

Let see that....

   One of my friend approached me as he is unable to install printers, shared through print server on a windows 7 computer with standard user rights. I helped him to get out of that. I though it would be good if I share those steps with you..

  The point and print Restriction can be configure locally for each and every machine or can be controlled globally through group policy management console in a domain environment.


   To configure it, Open group policy editor, and expand Computer configuration > Administrative templates and select Printers.

   In the right pane double click on Point and print restrictions, set it as enabled and select the option as in the image.


   Once it's been set in Computer configuration, Expand User configuration > Administartive templates > Control panel > Printers.
      
  In the right pane double click on Point and print restrictions, set it as enabled and select the option as in the image.


   Once you are done. Close the group policy editor refresh group policy settings and try to  install the printer. There won't be a flaw..

   Hope this helps...

                                                                                                                                   Techytips

Thursday, December 23, 2010

How to recover a permanently deleted file or folder instantly; Free delteed file recovery software


In this article we will talk about recovering a deleted file or folder in your computer instantly free of cost. While googling i found this valuable tool which helps us to recover files instantly. I though i must share that here.

Download the software Restoration from here , extract the content and copy the folder to a place which is convenient to you like on your desktop.

That's it you can now start recovering deleted files or folders through that software.

To recover a file or folder open the restoration.exe which is located inside the folder, by double clicking on it. If you use vista or windows 7 right click on the restoration.exe and select run as administrator .


Select the drive from which you deleted that particular file or folder.

Type the name of the folder or file if you are sure about it.

Then click search deleted files to start the scan through the drive.


After the scan is completed it will list all the files deleted recently. Select the file or folder you want to recover and click restore by copying.

Save the recovered items in a separate drive.


Hope this helps.

                                                                                                                                        Techytips

Wednesday, December 1, 2010

Windows 7 32 bit driver for dell inspiron N4010 (Inspiran 14R) laptop, How to find and install correct versions of drivers if you are unable to find it from official site

      A friend of mine purchased a dell inspiron n4010 with windows 7 64 bit version. he never attached to 64 bit versions. he planned to change his Os as he is having 32 bit windows 7 DVD.

       He installed 32 bit version and struck up with the drivers. In dell website he was unable to find 32 version of drivers as they only provide 64 bit versions. He tried his level best in searching and he approached me. With a workaround we succeeded in  installing the drivers. Finally i realize for a normal user it's quite difficult to get the drivers. So I thought of sharing the workaround in my blog. Let see that...


WORKAROUND

1. At first browse the available driver set for that particular laptop, in it's website.

2. Note down the hardware manufacturer and versions (like realtec gigabyte ethernet adapter, intel wimax link 6260, ATI mobility radeon hd 550v,  etc)

3. Download and install the driver version you required from the hardware manufacturer website. In the hardware manufacturer's website driver version's compatible with all os may available.

4. For example, Your Dell laptop is having intel wimax 6260 adapter and in dell official website 32 bit version driver is not available for download, you should go to Intel website and download the right version of driver for intel wimax 6260 adapter which should be compatible with your Os.

     This procedure will work for all laptops to find and install correct versions of drivers if you are unable to find it from laptop's official website. But in this case we will do it for Dell inspiron n4010.

    As an example, we are going to find and install 32 bit wireless network adapter driver for Inspiron N4010 laptop. Go to http://supportapj.dell.com/support/downloads/index.aspx?c=in&cs=indhs1&l=en&s=dhs&~ck=mn and select your laptop model as Inspiron N4010. Chose your operating system as windows 7 64 bit, Click find downloads. This will list all the drivers available for N4010 laptop compatible with windows 7 64 bit.


In the available drivers list expand network and note down the adapter's commercial name.

Then go to, http://downloadcenter.intel.com/ and select wireless Networking > Intel wimax Adapters > intel wimax 6260 and then select your operating system. Download the drivers install it enjoy.


Like the same way you could find and install drivers for display adapter, Ethernet adapter, Sound drivers etc.. for all the laptops

Hope this helps.

                                                                                                                                Techytips

Saturday, November 27, 2010

How to recover a deleted subfolder from .pst (outlook personnel folder) file


         We have lot's and lot's good software available in the internet to recover a deleted file. But none of them is going to help you if you delete a sub folder or a bunch of mails from a personnel folder (.PST) in outlook. If you delete the whole folder you can retrieve it with the help of some recovery software but you cannot if you permanently delete a subfolder from .PST file.


        But there are some things we can do and make our self proud  to recover a deleted subfolder or a bunch of mails from .PST (outlook personnel folder) file free of cost. Let's see that...


We are going to divide the whole procedure into three steps.

1. Make a copy of the original .pst file.

2. Edit the binary information in the file and make it corrupted

3. recover the deleted subfolder by using a Microsoft tool

In the first part you are going to make a copy of the .pst file. Say you deleted a subfolder from a personnel folder and you are ready to recover the.

Now we are going to edit the binary information of the .pst file to make it corrupted.  Download hex edit neo and install it in your computer. Open the .pst file through hex edit neo and edit the values to 00 for 5-6 lines  starting from 0000002. Do not edit the information at the line before 000020 as it will completely destroy the .pst file.


Save and close it. Now you did corrupt the pst file.

Now go to c:\program files\Microsoft office\ office 14 and double click on scanpst.exe, browse the location of the pst file and select start.


Once the checking is completed remove the check mark from make a backup and select repair. That's it, you are done. Wait for 2 minutes the process will be completed.

Link the recovered pst file to your outlook and you will find the deleted subfolder inside deleted items folder.

Hope this article helps.

                                                                                                                            Techytips

Friday, November 12, 2010

How to Download Google books Easily and free of cost


Welcome back all. In this post we will describe how to download e books from Google books website. Google books website is excellent service offered by Google, you can read all the books available with Google free of cost. But for some books the option to download is not available. But by doing some tweak you can download those books too.


Firefox (browser) must be installed to download those books. Carefully follow the steps and download the entire book.
Enjoy..


Open your Firefox browser , If don't have it, download and install it from here Firefox ...

Visit https://addons.mozilla.org/en-US/firefox/addon/748/ and click on add to Firefox to add grease monkey add-on to your Firefox browser. It will ask you to restart your browser, restart it. Once you did add grease monkey to Firefox you are ready to install Google books downloader.

Google books downloader is a nice script works with Grease monkey to help you you to download Google books. Go to User scrips.org and click install. That's it you are done.

Restart your Firefox and go to Googlebooks and  search and find the book you are looking for.


Once you start reading the book, Download this book button will appear, Click that button and it will start capturing all the pages of that particular book as .png image files. Once it did create links for all the .png files you can select all and download it by any download managers or you can use the pp1, pp1, pp3 buttons appearing at the right side of each pages of the book to download all the pages one by one.

Then you can take printout of those pages.

Hope this article will help you.

                                                                                                                            Techytips

Monday, August 23, 2010

Moving the pointer without a mouse..!


Ever thought that you could move your mouse pointer without your mouse..? No, not really, isn't it..? But, it's possible..!

Here is how:

1.Press Left Alt + Left Shift + Num Lock Button and click OK in the dialogue box that appears.

2.In your Taskbar, a mouse-like icon will appear. Double click it and under "Mouse" tab, make sure that the "Use Mouse Keys" is checked....

3.Also ensure that the Num Lock is ON (ie. the light must glow).

2.Now with the help of Numeric Keypad e.g ( Press and Hold the following Keys )

7 8 9

4 6

1 2 3

For normal click, press 5

Interesting, isn't it? You can also change settings under the "Mouse" tab in "Accessibility Options", by clicking on Settings


Wednesday, August 4, 2010

Interresting fact about IE that will cause disaster...

Read this article... Please don't copy and paste any text information like your passwords, account name, and stuff like that... An Mokka website can cull the contents of your clipboard..


There are JavaScript functions built into IE that not only allow a site to set the contents of your clipboard but retrieve them as well.

IE users, try this one on for size (this only works with Internet Explorer, to my knowledge):...

First, click this link to copy the phrase "My Dog Has Fleas" to your clipboard. Now open up a Notepad window (or whatever your favorite text editor is) and paste it in - sure enough, it adds info to your clipboard.

Now copy some arbitrary text to your clipboard. Doesn't matter what it is - type something in that Notepad window, or highlight something on this page, and copy it. Now click this link to show your clipboard contents.

Pretty freaky, huh?

For the curious... the "insert data into clipboard" code is:
window.clipboardData.setData('Text', 'My Dog Has Fleas');

...and the "retrieve data from clipboard" code is:
window.clipboardData.getData('Text');

Saturday, July 31, 2010

Windows 7 Keyboard shortcuts

The following table contains keyboard shortcuts that can help make your computer easier to use.
Press this key
To do this
Right Shift for eight seconds
Turn Filter Keys on and off
Left Alt+Left Shift+PrtScn (or PrtScn)
Turn High Contrast on or off
Left Alt+Left Shift+Num Lock
Turn Mouse Keys on or off
Shift five times
Turn Sticky Keys on or off
Num Lock for five seconds
Turn Toggle Keys on or off
Windows logo key Picture of Windows logo key +U
Open the Ease of Access Center.....

The following table contains general keyboard shortcuts.
Press this key
To do this
F1
Display Help
Ctrl+C (or Ctrl+Insert)
Copy the selected item
Ctrl+X
Cut the selected item
Ctrl+V (or Shift+Insert)
Paste the selected item
Ctrl+Z
Undo an action
Ctrl+Y
Redo an action
Delete (or Ctrl+D)
Delete the selected item and move it to the Recycle Bin
Shift+Delete
Delete the selected item without moving it to the Recycle Bin first
F2
Rename the selected item
Ctrl+Right Arrow
Move the cursor to the beginning of the next word
Ctrl+Left Arrow
Move the cursor to the beginning of the previous word
Ctrl+Down Arrow
Move the cursor to the beginning of the next paragraph
Ctrl+Up Arrow
Move the cursor to the beginning of the previous paragraph
Ctrl+Shift with an arrow key
Select a block of text
Shift with any arrow key
Select more than one item in a window or on the desktop, or select text within a document
Ctrl with any arrow key+Spacebar
Select multiple individual items in a window or on the desktop
Ctrl+A
Select all items in a document or window
F3
Search for a file or folder
Alt+Enter
Display properties for the selected item
Alt+F4
Close the active item, or exit the active program
Alt+Spacebar
Open the shortcut menu for the active window
Ctrl+F4
Close the active document (in programs that allow you to have multiple documents open simultaneously)
Alt+Tab
Switch between open items
Ctrl+Alt+Tab
Use the arrow keys to switch between open items
Ctrl+Mouse scroll wheel
Change the size of icons on the desktop
Windows logo key Picture of Windows logo key +Tab
Cycle through programs on the taskbar by using Aero Flip 3-D
Ctrl+Windows logo key Picture of Windows logo key +Tab
Use the arrow keys to cycle through programs on the taskbar by using Aero Flip 3-D
Alt+Esc
Cycle through items in the order in which they were opened
F6
Cycle through screen elements in a window or on the desktop
F4
Display the address bar list in Windows Explorer
Shift+F10
Display the shortcut menu for the selected item
Ctrl+Esc
Open the Start menu
Alt+underlined letter
Display the corresponding menu
Alt+underlined letter
Perform the menu command (or other underlined command)
F10
Activate the menu bar in the active program
Right Arrow
Open the next menu to the right, or open a submenu
Left Arrow
Open the next menu to the left, or close a submenu
F5 (or Ctrl+R)
Refresh the active window
Alt+Up Arrow
View the folder one level up in Windows Explorer
Esc
Cancel the current task
Ctrl+Shift+Esc
Open Task Manager
Shift when you insert a CD
Prevent the CD from automatically playing
Left Alt+Shift
Switch the input language when multiple input languages are enabled
Ctrl+Shift
Switch the keyboard layout when multiple keyboard layouts are enabled
Right or Left Ctrl+Shift
Change the reading direction of text in right-to-left reading languages

The following table contains keyboard shortcuts for use in dialog boxes.
Press this key
To do this
Ctrl+Tab
Move forward through tabs
Ctrl+Shift+Tab
Move back through tabs
Tab
Move forward through options
Shift+Tab
Move back through options
Alt+underlined letter
Perform the command (or select the option) that goes with that letter
Enter
Replaces clicking the mouse for many selected commands
Spacebar
Select or clear the check box if the active option is a check box
Arrow keys
Select a button if the active option is a group of option buttons
F1
Display Help
F4
Display the items in the active list
Backspace
Open a folder one level up if a folder is selected in the Save As or Open dialog box

The following table contains keyboard shortcuts that use the Windows logo key Picture of Windows logo key.
Press this key
To do this
Windows logo key Picture of Windows logo key
Open or close the Start menu.
Windows logo key Picture of Windows logo key +Pause
Display the System Properties dialog box.
Windows logo key Picture of Windows logo key +D
Display the desktop.
Windows logo key Picture of Windows logo key +M
Minimize all windows.
Windows logo key Picture of Windows logo key +Shift+M
Restore minimized windows to the desktop.
Windows logo key Picture of Windows logo key +E
Open Computer.
Windows logo key Picture of Windows logo key +F
Search for a file or folder.
Ctrl+Windows logo key Picture of Windows logo key +F
Search for computers (if you're on a network).
Windows logo key Picture of Windows logo key +L
Lock your computer or switch users.
Windows logo key Picture of Windows logo key +R
Open the Run dialog box.
Windows logo key Picture of Windows logo key +T
Cycle through programs on the taskbar.
Windows logo key Picture of Windows logo key+number
Start the program pinned to the taskbar in the position indicated by the number. If the program is already running, switch to that program.
Shift+Windows logo key Picture of Windows logo key+number
Start a new instance of the program pinned to the taskbar in the position indicated by the number.
Ctrl+Windows logo key Picture of Windows logo key+number
Switch to the last active window of the program pinned to the taskbar in the position indicated by the number.
Alt+Windows logo key Picture of Windows logo key+number
Open the Jump List for the program pinned to the taskbar in the position indicated by the number.
Windows logo key Picture of Windows logo key +Tab
Cycle through programs on the taskbar by using Aero Flip 3-D.
Ctrl+Windows logo key Picture of Windows logo key +Tab
Use the arrow keys to cycle through programs on the taskbar by using Aero Flip 3-D.
Ctrl+Windows logo key Picture of Windows logo key +B
Switch to the program that displayed a message in the notification area.
Windows logo key Picture of Windows logo key +Spacebar
Preview the desktop.
Windows logo key Picture of Windows logo key +Up Arrow
Maximize the window.
Windows logo key Picture of Windows logo key +Left Arrow
Maximize the window to the left side of the screen.
Windows logo key Picture of Windows logo key +Right Arrow
Maximize the window to the right side of the screen.
Windows logo key Picture of Windows logo key +Down Arrow
Minimize the window.
Windows logo key Picture of Windows logo key +Home
Minimize all but the active window.
Windows logo key Picture of Windows logo key +Shift+Up Arrow
Stretch the window to the top and bottom of the screen.
Windows logo key Picture of Windows logo key +Shift+Left Arrow or Right Arrow
Move a window from one monitor to another.
Windows logo key Picture of Windows logo key +P
Choose a presentation display mode.
Windows logo key Picture of Windows logo key +G
Cycle through gadgets.
Windows logo key Picture of Windows logo key +U
Open Ease of Access Center.
Windows logo key Picture of Windows logo key +X
Open Windows Mobility Center.

The following table contains keyboard shortcuts for working with Windows Explorer windows or folders.
Press this key
To do this
Ctrl+N
Open a new window
Ctrl+W
Close the current window
Ctrl+Shift+N
Create a new folder
End
Display the bottom of the active window
Home
Display the top of the active window
F11
Maximize or minimize the active window
Ctrl+Period (.)
Rotate a picture clockwise
Ctrl+Comma (,)
Rotate a picture counter-clockwise
Num Lock+Asterisk (*) on numeric keypad
Display all subfolders under the selected folder
Num Lock+Plus Sign (+) on numeric keypad
Display the contents of the selected folder
Num Lock+Minus Sign (-) on numeric keypad
Collapse the selected folder
Left Arrow
Collapse the current selection (if it's expanded), or select the parent folder
Alt+Enter
Open the Properties dialog box for the selected item
Alt+P
Display the preview pane
Alt+Left Arrow
View the previous folder
Backspace
View the previous folder
Right Arrow
Display the current selection (if it's collapsed), or select the first subfolder
Alt+Right Arrow
View the next folder
Alt+Up Arrow
View the parent folder
Ctrl+Shift+E
Display all folders above the selected folder
Ctrl+Mouse scroll wheel
Change the size and appearance of file and folder icons
Alt+D
Select the address bar
Ctrl+E
Select the search box
Ctrl+F
Select the search box

The following table contains keyboard shortcuts for working with items on the taskbar.
Press this key
To do this
Shift+Click on a taskbar button
Open a program or quickly open another instance of a program
Ctrl+Shift+Click on a taskbar button
Open a program as an administrator
Shift+Right-click on a taskbar button
Show the window menu for the program
Shift+Right-click on a grouped taskbar button
Show the window menu for the group
Ctrl+Click on a grouped taskbar button
Cycle through the windows of the group

The following table contains keyboard shortcuts for working with Magnifier.
Press this key
To do this
Windows logo key Picture of Windows logo key+ Plus Sign (+) or Minus Sign (-)
Zoom in or out
Ctrl+Alt+Spacebar
Preview the desktop in full-screen mode
Ctrl+Alt+F
Switch to full-screen mode
Ctrl+Alt+L
Switch to lens mode
Ctrl+Alt+D
Switch to docked mode
Ctrl+Alt+I
Invert colors
Ctrl+Alt+arrow keys
Pan in the direction of the arrow keys
Ctrl+Alt+R
Resize the lens
Windows logo key Picture of Windows logo key+ Esc
Exit Magnifier

The following table contains keyboard shortcuts for working with Remote Desktop Connection.
Press this key
To do this
Alt+Page Up
Move between programs from left to right.
Alt+Page Down
Move between programs from right to left.
Alt+Insert
Cycle through programs in the order that they were started in.
Alt+Home
Display the Start menu.
Ctrl+Alt+Break
Switch between a window and full screen.
Ctrl+Alt+End
Display the Windows Security dialog box.
Alt+Delete
Display the system menu.
Ctrl+Alt+Minus Sign (-) on the numeric keypad
Place a copy of the active window, within the client, on the Terminal server clipboard (provides the same functionality as pressing Alt+PrtScn on a local computer).
Ctrl+Alt+Plus Sign (+) on the numeric keypad
Place a copy of the entire client window area on the Terminal server clipboard (provides the same functionality as pressing PrtScn on a local computer).
Ctrl+Alt+Right Arrow
“Tab” out of the Remote Desktop controls to a control in the host program (for example, a button or a text box). Useful when the Remote Desktop controls are embedded in another (host) program.
Ctrl+Alt+Left Arrow
“Tab” out of the Remote Desktop controls to a control in the host program (for example, a button or a text box). Useful when the Remote Desktop controls are embedded in another (host) program.

Note

Ctrl+Alt+Break and Ctrl+Alt+End are available in all Remote Desktop sessions, even when you've set up the remote computer to recognize Windows keyboard shortcuts.

The following table contains keyboard shortcuts for working with Paint.
Press this key
To do this
Ctrl+N
Create a new picture
Ctrl+O
Open an existing picture
Ctrl+S
Save changes to a picture
F12
Save the picture as a new file
Ctrl+P
Print a picture
Alt+F4
Close a picture and its Paint window
Ctrl+Z
Undo a change
Ctrl+Y
Redo a change
Ctrl+A
Select the entire picture
Ctrl+X
Cut a selection
Ctrl+C
Copy a selection to the Clipboard
Ctrl+V
Paste a selection from the Clipboard
Right Arrow
Move the selection or active shape right by one pixel
Left Arrow
Move the selection or active shape left by one pixel
Down Arrow
Move the selection or active shape down by one pixel
Up Arrow
Move the selection or active shape up by one pixel
Esc
Cancel a selection
Delete
Delete a selection
Ctrl+B
Bold selected text
Ctrl++
Increase the width of a brush, line, or shape outline by one pixel
Ctrl+-
Decrease the width of a brush, line, or shape outline by one pixel
Ctrl+I
Italicize selected text
Ctrl+U
Underline selected text
Ctrl+E
Open the Properties dialog box
Ctrl+W
Open the Resize and Skew dialog box
Ctrl+Page Up
Zoom in
Ctrl+Page Down
Zoom out
F11
View a picture in full-screen mode
Ctrl+R
Show or hide the ruler
Ctrl+G
Show or hide gridlines
F10 or Alt
Display keytips
Shift+F10
Show the current shortcut menu
F1
Open Paint Help

The following table contains keyboard shortcuts for working with WordPad.
Press this key
To do this
Ctrl+N
Create a new document
Ctrl+O
Open an existing document
Ctrl+S
Save changes to a document
F12
Save the document as a new file
Ctrl+P
Print a document
Alt+F4
Close WordPad
Ctrl+Z
Undo a change
Ctrl+Y
Redo a change
Ctrl+A
Select the entire document
Ctrl+X
Cut a selection
Ctrl+C
Copy a selection to the Clipboard
Ctrl+V
Paste a selection from the Clipboard
Ctrl+B
Make selected text bold
Ctrl+I
Italicize selected text
Ctrl+U
Underline selected text
Ctrl+=
Make selected text subscript
Ctrl+Shift+=
Make selected text superscript
Ctrl+L
Align text left
Ctrl+E
Align text center
Ctrl+R
Align text right
Ctrl+J
Justify text
Ctrl+1
Set single line spacing
Ctrl+2
Set double line spacing
Ctrl+5
Set line spacing to 1.5
Ctrl+Shift+>
Increase the font size
Ctrl+Shift+<
Decrease the font size
Ctrl+Shift+A
Change characters to all capitals
Ctrl+Shift+L
Change the bullet style
Ctrl+D
Insert a Microsoft Paint drawing
Ctrl+F
Find text in a document
F3
Find the next instance of the text in the Find dialog box
Ctrl+H
Replace text in a document
Ctrl+Left Arrow
Move the cursor one word to the left
Ctrl+Right Arrow
Move the cursor one word to the right
Ctrl+Up Arrow
Move the cursor to the line above
Ctrl+Down Arrow
Move the cursor to the line below
Ctrl+Home
Move to the beginning of the document
Ctrl+End
Move to the end of the document
Ctrl+Page Up
Move up one page
Ctrl+Page Down
Move down one page
Ctrl+Delete
Delete the next word
F10
Display keytips
Shift+F10
Show the current shortcut menu
F1
Open WordPad Help

The following table contains keyboard shortcuts for working with Calculator.
Press this key
To do this
Alt+1
Switch to Standard mode
Alt+2
Switch to Scientific mode
Alt+3
Switch to Programmer mode
Alt+4
Switch to Statistics mode
Ctrl+E
Open date calculations
Ctrl+H
Turn calculation history on or off
Ctrl+U
Open unit conversion
Alt+C
Calculate or solve date calculations and worksheets
F1
Open Calculator Help
Ctrl+Q
Press the M- button
Ctrl+P
Press the M+ button
Ctrl+M
Press the MS button
Ctrl+R
Press the MR button
Ctrl+L
Press the MC button
%
Press the % button
F9
Press the +/– button
/
Press the / button
*
Press the * button
+
Press the + button
-
Press the – button
R
Press the 1/× button
@
Press the square root button
0-9
Press the number buttons (0-9)
=
Press the = button
.
Press the . (decimal point) button
Backspace
Press the backspace button
Esc
Press the C button
Del
Press the CE button
Ctrl+Shift+D
Clear the calculation history
F2
Edit the calculation history
Up Arrow key
Navigate up in the calculation history
Down Arrow key
Navigate down in the calculation history
Esc
Cancel editing the calculation history
Enter
Recalculate the calculation history after editing
F3
Select Degrees in Scientific mode
F4
Select Radians in Scientific mode
F5
Select Grads in Scientific mode
I
Press the Inv button in Scientific mode
D
Press the Mod button in Scientific mode
Ctrl+S
Press the sinh button in Scientific mode
Ctrl+O
Press the cosh button in Scientific mode
Ctrl+T
Press the tanh button in Scientific mode
(
Press the ( button in Scientific mode
)
Press the ) button in Scientific mode
N
Press the ln button in Scientific mode
;
Press the Int button in Scientific mode
S
Press the sin button in Scientific mode
O
Press the cos button in Scientific mode
T
Press the tan button in Scientific mode
M
Press the dms button in Scientific mode
P
Press the pi button in Scientific mode
V
Press the F-E button in Scientific mode
X
Press the Exp button in Scientific mode
Q
Press the x^2 button in Scientific mode
Y
Press the x^y button in Scientific mode
#
Press the x^3 button in Scientific mode
L
Press the log button in Scientific mode
!
Press the n! button in Scientific mode
Ctrl+Y
Press the y√x button in Scientific mode
Ctrl+B
Press the 3√x button in Scientific mode
Ctrl+G
Press the 10x button in Scientific mode
F5
Select Hex in Programmer mode
F6
Select Dec in Programmer mode
F7
Select Oct in Programmer mode
F8
Select Bin in Programmer mode
F12
Select Qword in Programmer mode
F2
Select Dword in Programmer mode
F3
Select Word in Programmer mode
F4
Select Byte in Programmer mode
K
Press the RoR button in Programmer mode
J
Press the RoL button in Programmer mode
<
Press the Lsh button in Programmer mode
>
Press the Rsh button in Programmer mode
%
Press the Mod button in Programmer mode
(
Press the ( button in Programmer mode
)
Press the ) button in Programmer mode
|
Press the Or button in Programmer mode
^
Press the Xor button in Programmer mode
~
Press the Not button in Programmer mode
&
Press the And button in Programmer mode
A-F
Press the A-F buttons in Programmer mode
Spacebar
Toggles the bit value in Programmer mode
A
Press the Average button in Statistics mode
Ctrl+A
Press the Average Sq button in Statistics mode
S
Press the Sum button in Statistics mode
Ctrl+S
Press the Sum Sq button in Statistics mode
T
Press the S.D. button in Statistics mode
Ctrl+T
Press the Inv S.D. button in Statistics mode
D
Press the CAD button in Statistics mode

The following table contains keyboard shortcuts for working with Windows Journal.
Press this key
To do this
Ctrl+N
Start a new note
Ctrl+O
Open a recently used note
Ctrl+S
Save changes to a note
Ctrl+Shift+V
Move a note to a specific folder
Ctrl+P
Print a note
Alt+F4
Close a note and its Journal window
Ctrl+Z
Undo a change
Ctrl+Y
Redo a change
Ctrl+A
Select all items on a page
Ctrl+X
Cut a selection
Ctrl+C
Copy a selection to the Clipboard
Ctrl+V
Paste a selection from the Clipboard
Esc
Cancel a selection
Delete
Delete a selection
Ctrl+F
Start a basic find
Ctrl+G
Go to a page
F5
Refresh find results
F5
Refresh the note list
F6
Toggle between a note list and a note
Ctrl+Shift+C
Display a shortcut menu for column headings in a note list
F11
View a note in full-screen mode
F1
Open Journal Help

The following table contains keyboard shortcuts for working with the Help viewer.
Press this key
To do this
Alt+C
Display the Table of Contents
Alt+N
Display the Connection Settings menu
F10
Display the Options menu
Alt+Left Arrow
Move back to the previously viewed topic
Alt+Right Arrow
Move forward to the next (previously viewed) topic
Alt+A
Display the customer support page
Alt+Home
Display the Help and Support home page
Home
Move to the beginning of a topic
End
Move to the end of a topic
Ctrl+F
Search the current topic
Ctrl+P
Print a topic
F3
Move the cursor to the search box

Twitter Delicious Facebook Digg Stumbleupon Favorites More

 
Design by Free WordPress Themes | Bloggerized by Lasantha - Premium Blogger Themes | Bluehost Coupons