Thursday, December 23, 2010

How to recover a permanently deleted file or folder instantly; Free delteed file recovery software


In this article we will talk about recovering a deleted file or folder in your computer instantly free of cost. While googling i found this valuable tool which helps us to recover files instantly. I though i must share that here.

Download the software Restoration from here , extract the content and copy the folder to a place which is convenient to you like on your desktop.

That's it you can now start recovering deleted files or folders through that software.

To recover a file or folder open the restoration.exe which is located inside the folder, by double clicking on it. If you use vista or windows 7 right click on the restoration.exe and select run as administrator .


Select the drive from which you deleted that particular file or folder.

Type the name of the folder or file if you are sure about it.

Then click search deleted files to start the scan through the drive.


After the scan is completed it will list all the files deleted recently. Select the file or folder you want to recover and click restore by copying.

Save the recovered items in a separate drive.


Hope this helps.

                                                                                                                                        Techytips

Tuesday, December 14, 2010

Dial-in tab missing in windows 7 RSAT(remote server administration toolkit) Sollution. VPN and remote access snap in


  It's observed from Microsoft that they have no update or patch for adding dial-in tab in ADUC when we use remote server administration toolkit in windows7. They are suggestion us to use dsa.msc as a remote application as a remedy.

But i know that we don't like that workaround.  After a bit research I've added dial-in tab to ADUC with RSAT in windows 7. Let see that workaround.

The solution is simple, you just need to copy two files from your DC, paste those files to respective places and register that file.

     If you are using windows 7 32 bit, find a DC in your domain with windows server 2008 32 bit, copy rasuser.dll from c:\windows\system32 and paste it to c:\windows\system32 in your windows 7 computer.

    Then find rasuser.dll.mui from c:\windows\system32\en-us of your DC and paste it to
c:\windows\system32\en-us of your windows 7 computer.

    Run command prompt with admin previleges, and type regsvr32 rasuser.dll and hit enter. That's it you are done. Open your AUDC and you will find dial in tab on your objects properties.


For 64 bit windows 7 users, the procedure remains same except you will have to copy those files from a DC with windows server 2008 64 bit .


If you are unable find those files for 64 bit simply download it from below links and paste it.

For 64 bit

Hope this helps.
                                                                                                                                   Techytips

Thursday, December 9, 2010

How to dismantle hp probook 4520, 4410, 4420, 4320, 5310,4710,4515 laptops; Hp probook laptops service guide


A friend of mine purchased a Hp probook 4410 s laptop with 2Gb DDR2 ram. Then he realized he needs to add some more ram for sophisticated experience.
So he purchased ram sticks but couldn't find a way to insert it, there is no visible screws to dismantle the laptop. I helped him to update that.

So it would be good to share the procedure with you all.. Let see that...


Remove the battery and unscrew the four screws marked in the below Image.


Unscrew those screws at both sides of the lcd panel as mentioned below.


After removing those screws push speaker cover gently to take it off.


Once you took the speaker cover apart remove unscrew the three screws


gently push the keypad to take it off.


Unscrew the three screws


Again gently push to take off the touchpad


Finally you will get access to ram and hard disk


Hope this helps.


                                                                                                                                    Techytips

Wednesday, December 1, 2010

Windows 7 32 bit driver for dell inspiron N4010 (Inspiran 14R) laptop, How to find and install correct versions of drivers if you are unable to find it from official site

      A friend of mine purchased a dell inspiron n4010 with windows 7 64 bit version. he never attached to 64 bit versions. he planned to change his Os as he is having 32 bit windows 7 DVD.

       He installed 32 bit version and struck up with the drivers. In dell website he was unable to find 32 version of drivers as they only provide 64 bit versions. He tried his level best in searching and he approached me. With a workaround we succeeded in  installing the drivers. Finally i realize for a normal user it's quite difficult to get the drivers. So I thought of sharing the workaround in my blog. Let see that...


WORKAROUND

1. At first browse the available driver set for that particular laptop, in it's website.

2. Note down the hardware manufacturer and versions (like realtec gigabyte ethernet adapter, intel wimax link 6260, ATI mobility radeon hd 550v,  etc)

3. Download and install the driver version you required from the hardware manufacturer website. In the hardware manufacturer's website driver version's compatible with all os may available.

4. For example, Your Dell laptop is having intel wimax 6260 adapter and in dell official website 32 bit version driver is not available for download, you should go to Intel website and download the right version of driver for intel wimax 6260 adapter which should be compatible with your Os.

     This procedure will work for all laptops to find and install correct versions of drivers if you are unable to find it from laptop's official website. But in this case we will do it for Dell inspiron n4010.

    As an example, we are going to find and install 32 bit wireless network adapter driver for Inspiron N4010 laptop. Go to http://supportapj.dell.com/support/downloads/index.aspx?c=in&cs=indhs1&l=en&s=dhs&~ck=mn and select your laptop model as Inspiron N4010. Chose your operating system as windows 7 64 bit, Click find downloads. This will list all the drivers available for N4010 laptop compatible with windows 7 64 bit.


In the available drivers list expand network and note down the adapter's commercial name.

Then go to, http://downloadcenter.intel.com/ and select wireless Networking > Intel wimax Adapters > intel wimax 6260 and then select your operating system. Download the drivers install it enjoy.


Like the same way you could find and install drivers for display adapter, Ethernet adapter, Sound drivers etc.. for all the laptops

Hope this helps.

                                                                                                                                Techytips

Saturday, November 27, 2010

How to recover a deleted subfolder from .pst (outlook personnel folder) file


         We have lot's and lot's good software available in the internet to recover a deleted file. But none of them is going to help you if you delete a sub folder or a bunch of mails from a personnel folder (.PST) in outlook. If you delete the whole folder you can retrieve it with the help of some recovery software but you cannot if you permanently delete a subfolder from .PST file.


        But there are some things we can do and make our self proud  to recover a deleted subfolder or a bunch of mails from .PST (outlook personnel folder) file free of cost. Let's see that...


We are going to divide the whole procedure into three steps.

1. Make a copy of the original .pst file.

2. Edit the binary information in the file and make it corrupted

3. recover the deleted subfolder by using a Microsoft tool

In the first part you are going to make a copy of the .pst file. Say you deleted a subfolder from a personnel folder and you are ready to recover the.

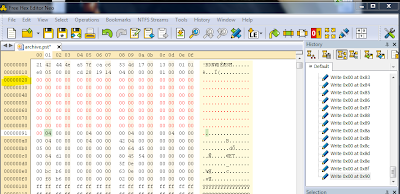
Now we are going to edit the binary information of the .pst file to make it corrupted.  Download hex edit neo and install it in your computer. Open the .pst file through hex edit neo and edit the values to 00 for 5-6 lines  starting from 0000002. Do not edit the information at the line before 000020 as it will completely destroy the .pst file.


Save and close it. Now you did corrupt the pst file.

Now go to c:\program files\Microsoft office\ office 14 and double click on scanpst.exe, browse the location of the pst file and select start.


Once the checking is completed remove the check mark from make a backup and select repair. That's it, you are done. Wait for 2 minutes the process will be completed.

Link the recovered pst file to your outlook and you will find the deleted subfolder inside deleted items folder.

Hope this article helps.

                                                                                                                            Techytips

Thursday, November 25, 2010

How to uninstall internet explorer 9 (ie9) beta version installed through windows updates


Hey all, In this post we will talk about uninstalling removing internet explorer 9 beta version which is installed through windows update.

Yes, browsing with ie9 beta is full of hangs and crashes. Microsoft shouldn't have done that, installing ie9 without user's notice as automatic windows update.  Okay let's talk about uninstalling that...


1.  Go to control panel > Classic view > Programs and features.


2. In the program and features windows, click on View installed updates.


3. In the update history window find "windows internet explorer 9" right click on that, and click uninstall. it will start uninstalling ie9 beta.


4. Once the uninstall is over, restart your computer. You will be having internet explorer 8.

Hope this helps.

                                                                                                                                   Techytips

Monday, November 22, 2010

How to get more battery backup and increase your laptop's battery's life


Do you want to have a handsome hours of your laptop's battery backup?

Everybody prefers to work with laptop, even I do with the Conveniences offered by laptops. We can carry it to anywhere, literally anywhere..

But If your laptop's battery backup is less, You are stumped. But in this article we will talk about the instruction you need to follow to have a reasonably good battery backup and life.. 

Let's talk about that....


COMPLETE CYCLES

       You need to use your battery with complete cycles. Always allow your battery to discharge it self to 5-10 percent, then charge it to 100 percent. You can do this by removing laptop charger when you battery is 100 percent put that back when your battery level is 10 percent. By following this method your battery's ability to stand will increase. Discharge your battery at least twice in a week.

DON'T CLOSE THE LID

      Don't close your laptop's lid while it's shutting down or it's in use. By default if you close your laptop's lid at any time, your laptop will go to standby mode and this will consume some power from your battery. This will reduce the ability of your battery. so close your laptop's lid only after shutting it down.

POWER SETTINGS

     If your laptop is on battery change the power plan to power saver. If you select power saver as power plan, power distributed to peripherals like USb ports, WIFI adapters will be reduced and thus you will get more battery backup. In addition to that animation and transparency will be disabled if choose power saver.

SCREEN BRIGHTNESS

      Reduce your screen brightness while you are working on battery.  If you do so your battery backup time will considerably increase. So make sure you decrease the brightness while working on battery.

REMOVE UNWANTED PROGRAMS

     If any unwanted programs are running in background those program will consume power. So we could get more backup time by disabling those programs. You can disable unwanted services and startup programs with the procedure explained here . Check the services and startup portion.

USE WINDOWS 7

    Windows 7 has improved power saving qualities. So if you use windows 7 there is much chance to get more battery backup.


Hope this post help you increase your battery backup time..

                                                                                                                          Techytips

Saturday, November 20, 2010

Dell latitude E6510 cursor jumps while typing something (Sollution)

     I recently came across a problem with dell latitude E6510 laptop. when I drafting a mail or typing something urgently the cursor jumps to random location and creates a hell a lot of mess, which leads me in typing those from scratch. My laptop is a dell latitude E6510 came with windows 7 professional, I installed windows 7 ultimate as i don't like the way it looks.

     When I felt the random cursor jumps, I did suspect the touch pad and  reduced it's sensitivity through control panel.Then I told my self that I set it right, everything will be alright. But for my surprise there is no change in the behavior, the cursor still jumps and i was stumped.


But after a small research I realized that the cause of the problem is not because of touch pad and it's due to POINTING STICK (rubber head ) which dell equipped for the lovers of Pointing stick. I found that when i typing something my fingers touch that pointing stick, that causes the cursor to move somewhere It should not and to disable it is the only solution.

We can easily disable it with Dell touch pad application...


To do that, Go to control panel, change the view to small icons, and double click on Mouse to launch mouse properties window or you can simply type Mouse in the windows 7 search  bar and select mouse in the results.


In the mouse properties window, Click on Dell touch pad tab to launch the application. Once the application launched Click on Device select, In the device select windows click to disable Pointing stick and pointing stick buttons. or you can select disable touch pad/pointing stick when a usb mouse is present if you are using an external mouse.


Click apply, Ok. That's it. You're done. You disabled pointing stick and The cursor will not jump unexpectedly.. feel free to post back the results.


Hope this article will help you. Also have a look here to increase your battery backup


                                                                                                                                 Techytips

Tuesday, November 16, 2010

How to configure Homegroup to share files and printers in Windows 7


Homegroup, Introduced by Microsoft in windows 7, is the easier and secure way to share files, printers, documents, media, libraries..

But getting it to working state is a bit difficult for normal users without prior experience. In this article we will talk about Microsoft Homegroup and will guide you to configure it and master it..

Let's see that...


HOMEGROUP

       Ever frustrated to use pendrive or e-mail to transfer documents to other computer which is located at next room so that you can print them? Ridiculous, isn't it?  We can eliminate these, if we can share documents and printers between them.. Microsoft made it easier and secure to share printers, files,media, libraries and documents through homegroup. Homegroup is like logical boundary of computers connected together. You can decide what gets shared and what stays private.


HOW TO CONFIGURE

              Setting up a homegroup is not a big deal with the information provided here. You need to create a homegroup from any one of your computer and add other computers to that home group.
To create a home group, Go to control panel and select Chose home group and sharing option below network and internet and at the home group window, click Create a homegroup.


  select your preference to share and click next. Copy and paste the password to a notepad and save the text file on your desktop, so that we can use the password to join other computers. Congrats now you have created a home group.


To add other computers to Homegroup you created now,  Login to the computer, Go to control panel and select Chose home group and sharing option below network and internet and at the home group window, click on join now, select which you want to share, type Homegroup password from the text file and click finish.

That's it. You are done. If you have more than two computer's you can add them to homegroup using the above procedure. From each computers you can view other computers documents.


If any one of the computer connected to printer, all the computers can use the printer.

I hope this post will help you to configure HOMEGROUP and share files and printers securely..


                                                                                                                             Techytips

Friday, November 12, 2010

How to Download Google books Easily and free of cost


Welcome back all. In this post we will describe how to download e books from Google books website. Google books website is excellent service offered by Google, you can read all the books available with Google free of cost. But for some books the option to download is not available. But by doing some tweak you can download those books too.


Firefox (browser) must be installed to download those books. Carefully follow the steps and download the entire book.
Enjoy..


Open your Firefox browser , If don't have it, download and install it from here Firefox ...

Visit https://addons.mozilla.org/en-US/firefox/addon/748/ and click on add to Firefox to add grease monkey add-on to your Firefox browser. It will ask you to restart your browser, restart it. Once you did add grease monkey to Firefox you are ready to install Google books downloader.

Google books downloader is a nice script works with Grease monkey to help you you to download Google books. Go to User scrips.org and click install. That's it you are done.

Restart your Firefox and go to Googlebooks and  search and find the book you are looking for.


Once you start reading the book, Download this book button will appear, Click that button and it will start capturing all the pages of that particular book as .png image files. Once it did create links for all the .png files you can select all and download it by any download managers or you can use the pp1, pp1, pp3 buttons appearing at the right side of each pages of the book to download all the pages one by one.

Then you can take printout of those pages.

Hope this article will help you.

                                                                                                                            Techytips

Wednesday, November 10, 2010

Scan your pc for virus through internet by windows live one care :) free of cost


Hey friends, we had a discussion about how to safe guard your computer from virus even if you don't have an antivirus software in this post. In addition to that we can also utilize the Windows live one care to scan your computer for virus through internet free of cost.
Windows live one care is a free and powerful tool provided by Microsoft to ensure Windows 7 and Windows vista stability. Let see how do we configure and utilize it.

    To use One care you need to visit this site http://onecare.live.com/site/en-us/default.htm through the latest version of internet explorer. This product will only work through internet explorer, and Microsoft wants that.

    The full service scan consists of Protection which will check your computer for security threats, Cleanup which will clean the junks from your hard drive, and Tune up which will increase your computer's performance.This tool can be used only on vista and and windows 7 Os.  
We cannot use this tool on Windows xp.

    Before starting, open internet explorer and turn off pop-up blocker The procedure can be found here.In the One care home page, click on full service scan and click on launch full scan for windows vista and windows 7 to initiate the process and Click the install now button in the next page. Internet explorer will ask you install the add on, Right click on the yellow ribbon below file menu and select install this add on for all the users in this computer. The below image may assist you to find the yellow ribbon.


 Click Launch scanner button, select complete scan and click next in the pop up window.

Once you click next, It will initiate the download process wait until it's completed.


   Once the download completed it will start the scan, It may take an hour or two. Wait until the scan completed, it will clear your junk and will tune your computer for better performance.

do it at least Once a week and you don't need an antivirus software. I hope this article will help you. Don't forget to post comments.

                                                                                                                                       Techytips

Sunday, November 7, 2010

How to use safeboot to check which program affects your computer's stability

Smiley
Is your computer restarting frequently?!

Does your computer crash unexpectedly?!

Does your computer Hang often?!

An unwanted program may cause this. Yeah I know that you have lot more programs installed in your computer, But it's very easy to find the culprit out of all, through system configuration utility. This article will guide you how to find the culprit program and make your computer stable through system configuration utility. System configuration utility is one of the best tool provided by Microsoft to bring your computer's behavior back to normal.  let see how to do that...


SCENARIO


        Let's assume that your computer hangs and not responding to anything you click or type, the only way to bring your computer back is to restart it manually and this is happening frequently.. what will you do?! In this case I would use system configuration utility to find the culprit program and disable it.

DIAGNOSTIC STARTUP


       First thing you need to use is diagnostic startup. Through that we can tell the windows to load basic services and drivers which indispensable for windows operation and nothing more. If your computer is working well and good in diagnostic startup there is no problem in your computer's Os at all. To do that,  
  1. Type  msconfig in run and hit enter. This will bring up the system configuration utility window.
  2. click on general tab and select diagnostic startup. Click ok and restart your computer.
  3. Observe your computer's performance for a while, If it's stable you don't need to worry about as there is no problem in your OS.   Once you are clear that there is no problem in the diagnostic startup change the value back to normal startup and restart your computer

STARTUP PROGRAMS

       The next thing you need to check, is the startup programs which are configured itself to start when windows starts.. In the system configuration utility window, click on startup tab and disable all the startup items by clicking disable all button. Once all the startup items are disabled, restart your computer to check the problem persists. If you feel that the problem is solved after all the startup items disabled, enjoy having time with your computer. We can start the programs manually if we need that. 


SERVICES

       If your computer still hangs, you need to check the non Microsoft services by disabling it one by one. In the system configuration utility window, click on services tab and put a check mark on Hide all Microsoft services. This will hide all Microsoft related services and will show all the other services. Click on disable all and restart your computer. This should bring your computer back to normal. But make sure before you click disable all, You put a tick mark on Hide all Microsoft services. Otherwise your computer won't be able to start.

      The following procedures will guide you how to use system configuration utility and it's features. Hope you will find this article informative.
                                                                                                                           Techytips
 

Tuesday, November 2, 2010

How to keep your computer virus free without having an antivirus software


Don't have an antivirus software?!

Re-installing OS frequently due to virus infection?!

afraid  to use thumb drives?!

In this article we will guide you to keep your computer virus free as far as possible  without buying an antivirus software. There are many thing you have to be conscious about.. Let see those things...


USE A STANDARD ACCOUNT

                  Use your computer through a standard limited privileged account. I would recommend  you to create a standard user account other than the default Administrator account and use it because, the chance of being affected by virus code will be reduced by 95% . while using your computer through a standard account the virus program will not be able to inject any code as it will not get access to core windows services and files. hence, even if the virus code executed by you unknowingly there will be very minimum damage to your computer and that can be recovered easily. whenever you need to install any software, you can always log into your administrator account and do the installation. The procedure to create a standard user account is explained in this post


TURN UAC ON


               Microsoft introduced User Account Control in Vista and polished up in Windows7, UAC is a good tool if you master it. UAC prevent the execution of  any program or file in your computer and will notify you. if you turn that, On nothing will be executed without your permission . Mastering UAC will help you to edit the UAC settings. if you are using Windows 7, set the UAC as one level above never notify.


DISABLE AUTORUN FOR REMOVABLE DEVICES

             Most of the time if you use a thumb drive contains virus, the virus will inject it's code and take control over your computer. But you can prevent that by disabling Autoplay and accessing the pendrive through run. We discussed about disabling Autoplay earlier. you can find the post here . After you disable Autoplay, make sure you always access the thumb drive through Run window. I would not recommend you access your thumb drive through Autoplay or My computer.
            Connect the pendrive, open my computer and see the drive letter of your pendrive and open Run, type the drive letter followed by ":" . For example if the drive letter of my pendrive is 'F' , I'll type F: in run and will hit enter to access my pendrive. This is the safest way to access a thumb drive. If you follow these instructions, your computer will not be infected even if the thumb drive contains virus.

USE WINDOWS DEFENDER

          If you don't have an antivirus software turn on Windows defender or download the latest version from here and install it. It's a free program offered by Microsoft to prevent your computer from spyware, security threats and other potentially unwanted software. It can be easily downloaded, installed and updated definitions easily. Microsoft will not cost you anything for this program.

DON'T CLICK ON ALL THE LINKS

          You have to be very careful while you are browsing if you don't have antivirus software in your computer. If you are not sure about the reputation of the site you are viewing, don't click the links provided there like Scan your computer, prevent your computer, free tool like that. They will cause disaster and will stop your computer from loading properly.

USE SECURE BROWSER

         Always use secure browsers, like Firefox, Ie8 or above. I would personally recommend to use Firefox for browsing. because that is the safest browser I've used.

If you follow the precautions explained above you can keep your computer healthy as far as possible. Hope this article will help you to keep your computer safe.

                                                                                                                     Techytips

How to disable Autoplay for removable devices in vista and windows 7


Afraid to use thumb drives in your computer ?

Do u thing a thumb drive can execute virus program in your computer ?

No it's not, if you disable Autoplay for removable devices. All the virus program is designed to excecute itself when you click something in autorun prompt as you can see in the image posted left side. This is how virus programs spread across all the computers through thumb drive. In this article we will guide you to disable Autoplay and thus eliminate virus infection while using thumb drives...


HOW IT HAPPENS

         A virus programmer will create a .exe file which is actually a virus code and a autorun.inf file which execute the .exe file when you click anything on Autoplay  prompt. The information to excecute the .exe file is present in the autorun.inf file and both the files will be super hidden. hence you will not be able to see those two files. The typical virus code and a autorun.inf files are shown in the below image.


     If you insert this thumb drive into any computer the Autoplay pop up will come, if you select scan and fix, the application.exe which is a virus code will be executed and it will crash your computer. So never click anything on Autoplay prompt. let see how to disable the Autoplay in your computer..


HOW TO DISABLE AUTOPLAY

             It's a good fact that we can suppress the Autoplay window within your computer for removable media's like thumb drive, Cd's, Dvd's etc..


THROUGH GROUP POLICY

           Group policy editor is good tool through which we can allow and disable some of windows actions. To disable Autoplay,
  1. Type gpedit.msc in run and hit enter, click on continue for UAC if it asks.
  2. Expand Computer configuration, Administrative templates, Windows components, Autoplay policies in the right pane double click on Turn of Autoplay and select the radio button of Enabled and give OK.


That's it. You disabled Autoplay in your computer.


THROUGH REGISTRY EDITOR

          We can disable Autoplay through registry editor also.

  1. Type regedit in run and hit enter. click on continue for UAC if it asks.
  2. Expand H_KEY_LOCAL_MACHINE, SOFTWARE, MICROSOFT, WINDOWSNT, CURRENTVERSION, POLICIES, EXPLORER  in the right pane right click on empty space and select new, dword value.
  3. Change name as NoDriveTypeAutoRun. Now double click on NoDriveTypeAutoRun and type the value as ff. now say ok and positive response to all dialogues.

disable Autoplay through regedit

Edit registry only if you are familiar with regedit.  I would recommend to use the first method.

                                                                                                                              Techytipz


Monday, November 1, 2010

How to create standard and administartor accounts in vista and windows 7

This article will show you how create standard and administrator accounts in vista and windows 7 . It's always recommended to create and use a standard account for the sake of your computer's health.

TO CREATE A STANDARD ACCOUNT

  1.  Log in to your default administrator account or the other one which you are using right now. Type compmgmt.msc in run and hit enter. You will get computer management window.

     2.   In the computer management window Expand Local users and groups and Users....


     3.   Right click at the empty space on the right pane, select New user and fill the required information like name and password as filled in the below image and click on create.


     4.   That's it, you are done. You need to logoff from the current account and use the created standard account.


TO CREATE ADMINISTRATOR ACCOUNT


     1.   Once you created  a new standard user account as described above, double click the user account which you created, and select the member of tab.

     2.   In the member of windows, click on add,  type Administrators in prompt and select ok.


That's it you are done. Now you created a user account with admin privileges.

It's recommended that you have to use your computer through standard user account and install software and make changes to windows through your administrator account for the sake of your computer safety.


                                                                                                                                 Techytipz

Twitter Delicious Facebook Digg Stumbleupon Favorites More

 
Design by Free WordPress Themes | Bloggerized by Lasantha - Premium Blogger Themes | Bluehost Coupons