Showing posts with label Windows Tipz. Show all posts

Friday, April 29, 2016

Migrating to ConfigMgr Current Branch - Moving SUP (WSUS) to server 2012 R2

Hey guys. This is the second post in the series "Migrating to ConfigMgr Current Branch". In my first post we talked about moving MP to a server 2012 R2 and in this post we will talk about moving SUP to server 2012 R2. I wanted to index all the posts in this series to make the navigation easy for you guys.. Here it is

Migrating to ConfigMgr Current Branch

1.Migrating to ConfigMgr Current Branch - Migrating MP to server 2012 R2

2.Migrating to ConfigMgr Current Branch - Moving SUP (WSUS) to server 2012 R2


 Lets get into this,  The ConfigMgr 2012 instance I support has 2 SUP role instance on 2 different servers. Both the WSUS instances on the SUP's shares same SQL DB which resides under ConfigMgr DB instance and WSUS shared Content share which is hosted in a file share. Since both of WSUS uses same DB & Content share, and I really cant touch the DB as it is prod instance, I had to take the below approach to complete this task.

(new server 2012 R2 servers will be called sup2012_1 and sup2012_2  from now on in this post)

  • Install WSUS with WID (Windows internal Database) in sup2012_1
  • Detach the WID DB from sup2012_1 and attach it with ConfigMgr SQL instance with name different than default SUSDB(In my case, I had that named as SUSDB_<SiteCode>)
  • Configure sup2012_1 to use attached sql database
  • Install WSUS in sup2012_2 and configure to use the same DB and Content share used by sup2012_1
  • Configure SUP role in both sup2012 servers and initiate WSUS sync.
  • Perform functionality and availability tests
  • remove SUP role from server 2008 R2
Lets see each phase in detail.

Install WSUS with WID (Windows Internal database) in sup2012_1

  • Login to the server sup2012_1 and make sure firewall is turned off or necessary firewall rules are created allowing siteserver and sup2012_1 to communicate
  • Add the computer account of site server as a local admin in sup2012_1
  • If you have additional drive to install ConfigMgr component and don't want SCCM to get installed in C drive, create NO_SMS_ON_DRIVE.SMS in the root of C drive, so that the drive will be untouched.
  • Create a Share folder in a file share for WSUS content and add provide full control for everyone. (\\FileServer\ShareFolder)
  • Open an elevated PowerShell Console and execute the below command to install WSUS and required IIS features
Install-WindowsFeature -Name UpdateServices -IncludeManagementTools
  • Once the command completed successfully (Ignore the warning message about post installation configuration) execute the below command to perform post installation configurations
 "C:\Program Files\Update Services\Tools\wsusutil.exe" postinstall CONTENT_DIR="\\FileServer\ShareFolder"
  • After the post installation configurations are completed,  Launch IIS management console and navigate to Sites->WSUS Administration, right click on Content, select Manage Virtual directory and select Advance settings.
  • In the advance setting properties, Make sure Physical path starts with "\\", If not add as seen in the below screenshot


  •  Restart W3SVC and WSUS services
  • Launch WSUS administration console to make sure that the console launches without any error.(DO NOT CHANGE ANY CONFIGURATIONS THROUGH CONSOLE)

 Migrate from WID to Remote SQL (Server 2012 WSUS)
  • Download Microsoft ODBC Driver 11 for SQL Server and SQLCMD from the below links respectively.
https://www.microsoft.com/en-us/download/details.aspx?id=36434 
https://www.microsoft.com/en-us/download/details.aspx?id=36433
  • Install ODBC driver followed by SQLCMD in sup2012_1 server by following installation wizards 
  • stop W3SVC and WSUS services
  • open elevated command prompt and execute following commands to provision and detach WSUS DB from WID
sqlcmd -S \\.\pipe\MICROSOFT##WID\tsql\query
use master
alter database SUSDB set single_user with rollback immediate
go
sp_detach_db SUSDB
go
  • Once the above step completed successfully, Navigate to C:\Windows\WID\Data and copy the susdb.mdf to a shared location.
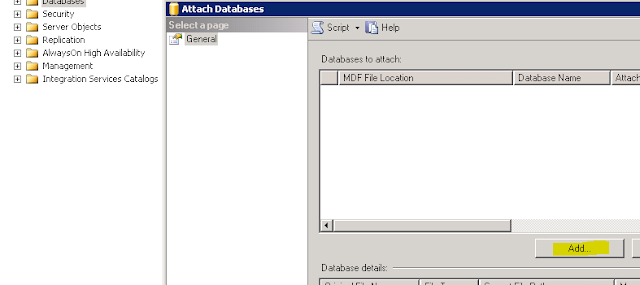
  • Login to SQL server where your existing SUSDB is hosted, Launch SSMS (SQL server management studio), connect to DB instance and attach the copied susdb.mdf file with name SUSDB_<SiteCode> by going through attach DB wizard
  • Once the DB is successfully attached, Login to SUP server(sup2012_1) with admin privileges, Navigate to HKLM\SOFTWARE\Microsoft\UpdateServices\Server\Setup in registry editor and change the values as shown below
SQLServerName: <SQL server Name>\<Instance Name>
SqlDatabaseName: SUSDB_<SiteCode>
ContentDir: \\FileServer\ShareFolder
  • Start W3SVC and WSUS service
  • Laucn WSUS admin console to make sure it is able to connect to DB

Install and Configure WSUS in sup2012_2(Replication Partner)

  • Login to the server sup2012_2 and make sure firewall is turned off or necessary firewall rules are created allowing siteserver and sup2012_2 to communicate
  • Add the computer account of site server as a local admin in sup2012_2
  • If you have additional drive to install ConfigMgr component and don't want SCCM to get installed in C drive, create NO_SMS_ON_DRIVE.SMS in the root of C drive, so that the drive will be untouched.
  • Open an elevated Powershell Console and execute the below command to install WSUS and required IIS features (Without DB)
install-windowsfeature -name updateservices-services -includemanagementtools
  • Open registry editor, navigate to  HKLM\SOFTWARE\Microsoft\UpdateServices\Server\Setup and change the values as shown below
    SQLServerName: <SQL server Name>\<Instance Name>
    SqlDatabaseName: SUSDB_<SiteCode>
    ContentDir: \\FileServer\ShareFolder
( Exact same values as in sup2012_1 server)
  • In elevated PowerShell console execute below command to perform post installation configurations
 "C:\Program Files\Update Services\Tools\wsusutil.exe" postinstall CONTENT_DIR="\\FileServer\ShareFolder"
  • Once the post installation configurations are completed,  Launch IIS management console and navigate to Sites->WSUS Administration, right click on Content, select Manage Virtual directory and select Advance settings.
  • In the advance setting properties, Make sure Physical path starts with "\\", If not add as seen in the below screenshot


  • Restart W3SVC and WSUS services.
  • Launch WSUS administration console to make sure that the console launches without any error.(DO NOT CHANGE ANY CONFIGURATIONS THROUGH CONSOLE)


Install SUP role in both servers (sup2012_1 & sup2012_2)


  • Connect to ConfigMgr site through PowerShell, by selecting "Connect via Windows PowerShell" from Console file menu

  • Execute the below power shell command to add server2012 as a sitesystem in your ConfigMgr site (If they are not already)
New-CMSiteSystemServer -ServerName "sup2012_1.<DomainName>.<Com>"  -SiteCode "<SiteCode>"
  • On successful completion of the above, execute the below power shell command to add sup2012_1 as a SUP
Add-CMSoftwareUpdatePoint -SiteSystemServerName  "sup2012_1.<DomainName>.<Com>"  -SiteCode "<SiteCode>" -ClientConnectionType Intranet -WsusiisPort "8530" -WsusiissslPort "8531" -Verbose
  • Go through supsetup.log in the installation directory and make sure the SUP installation succeeded.
  • Once the installation succeeded, Navigate to \Administration\Overview\Site Configuration\Servers and Site System Roles in ConfigMgr console, select sup2012_1, right click on SUP role to see the properties. Make sure all the options you need are selected and configured.
  • Go through wcm.log in site server and make sure the configuration completed without any errors. But if you happen to receive the below error in WCM, it can safely be ignored as this is known behaviour in ConfigMgr 2012 R2 SP2
Failed to create assembly name object for Microsoft.UpdateServices.Administration. Error = 0x80131701.    SMS_WSUS_CONFIGURATION_MANAGER    29.04.2016 09:09:07    11840 (0x2E40)
  • Once all are green, initiate an update sync in ConfigMgr console and observe the outcome.
  • Follow the above procedure to install SUP role in sup2012_2 and initiate a sync to make sure everything is Ok.

Known Errors

In this section we will talk about known errors while configuring a server 2012 R2 as SUP in ConfigMgr environment

Error1 - WSUS app pool crash

 When you configure a server 2012 R2 WSUS as ConfigMgr SUP,  WSUS app will crash while the clients starts using that SUP and The console will not connect WSUS with the below messages in event viewer.

Event ID:      12052
Task Category: 9
Level:         Error
Description:
The DSS Authentication Web Service is not working.

Event ID:      12042
Task Category: 9
Level:         Error
Description:
The SimpleAuth Web Service is not working.

Event ID:      12022
Task Category: 9
Level:         Error
Description:
The Client Web Service is not working.

Event ID:      12032
Task Category: 9
Level:         Error
Description:
The Server Synchronization Web Service is not working.

Event ID:      12012
Task Category: 9
Level:         Error
Description:
The API Remoting Web Service is not working.

Event ID:      12002
Task Category: 9
Level:         Error
The Reporting Web Service is not working.

Event ID:      13042
Task Category: 6
Level:         Error
Description:
Self-update is not working.

Fix

To fix we need to change certain values at the IIS level for WSUS website. To do that,
  • Launch IIS management console, Navigate to Application Pools, Right click on WSUS Pool and go to advance properties.
  •  In the advance settings properties change the Queue length to 50000 as shown in the below screenshot
 

  • After doing this change, restart W3SVC and WSUS services.

 Functionality & Availability tests

  • Launch ConfigMgr Admin console Navigate to Monitoring\Overview\Software Update Point Synchronization Status to verify that the newly Installed SUP synchronize without any issues
  • Additionally go through wsusctrl.log, wcm.log, wsyncmgr.log to make sure that there are no errors in SUP operations
  • Identify a group of test clients and make them report to newly installed SUP by changing local group polcy configuration. Launch gpedit.msc, navigate to Computer Configuration -> Administrative templates -> Windows Components -> Windows Update. Edit the policy "Specify intranet Microsoft Update service location" to type in your server name as in the below image.

  • Create a test Update group, Deployment package and deployment to make sure the test clients successfully complete the scan against newly installed SUP, download the content, Install the updates and perform post validation scans.
Remove server 2012 R2 SUP

 This is pretty much straight forward. The upstream SUP must be removed at last after all of it's downstream SUPs are removed.
  • Login to siteserver, In Admin console navigate to Administration\Overview\Site Configuration\Servers and Site System Roles, select the server 2008 R2 SUP in the right pane
  • Right click on the Software Update point role, and click on Remove Role
(While removing the upstream SUP it will ask you select new upstream server. From the drop down menu, select one of newly installed SUPs )
  • Supsetup.log to verify successful De-installation SUP role
  • Navigate to Administration\Overview\Site Configuration\Servers and Site System Roles, right client on the server 2008 r2 site system and select Delete.

 Hope this post would help you when you plan to move your SUP role from server 2008 R2 to server 2012 R2. I know this is a lengthy post and I tried my level best to explain without including too much screenshots.If you have any questions or suggestion, Please leave a comment. i will try to answer them. :-)

S A Delphin

Tuesday, July 24, 2012

"Disable failed No devices disabled" devcon.exe | How to disable devices from command prompt


 This article will help you in Disable or Enable devices from command prompt. And also this will discuss about the error u may likely to encounter.

It will be really good rite, when you can disconnect your modem or internet connection in one click after you are finished with it. This article will help you to do that.

First you need to have devcon.exe. An alternate to device manager which can be run through command prompt.

Download the devcon.exe from the below link

http://support.microsoft.com/kb/311272 

Once you downloaded the devcon exe file, extract  the exe and paste it inside c:\windows\system32 folder. That's it you are ready to run it. 

 I've read the above procedure in a blog, and wanted to try it.  But i was getting this message..

"
C:\Windows\system32>devcon disable *mouse*
HID\VID_04CA&PID_0030\7&3A7DF96F&0&0000                     : Disable failed
No devices disabled.
"

After some digging i found the the 64 bit version of devcon available to download form Microsoft website is not compatible for windows 7 64 bit. You will need to extract it from server 2003 64 bit dvd.

Once it's done it will work like a charm. I've extracted the 32 and 64 bit version devcon.exe from server 2003 dvd and uploaded it. You can download it from below links..

Devcon.exe 32 bit

Devcon.exe 64 bit


Hope this helps..
Techytipz

Friday, August 5, 2011

Allow standard user to change system date and time : How to change system date and time without admin privilege.


  Hey friends, In this post we will discuss about setting up permissions for a standard user to change system data and time in windows.
  Let see how we can do that..


   Login to your computer as ad administrator. Type secpol.msc in run and hit enter to open local security policy. Click on continue if UAC prompts...


  Expand local Policies>User right assignment, in the right pane double click on Change the system time to edit it.


  By default, Administrators and Local service will be having the permissions. To ad a standard user or a group, Click on add user or Group(marked as 1).  Then click on object type at the top right. Put a check mark on Groups if you want to add a group(marked as 2).

  Type Users and click on check names(marked a s 3). Once the group name is resolved, click on Ok in all opened windows to accept the change. You can even add a single user name if you don't want to add user group.

  That's it now login as a standard user, and you will be able to change the system data and time..

  You can even manage this security policy through GPO if you are inside a domain network. Need to edit your GPO as below.


Hope this will help you...

                                                                                                                                          Techytips

Tuesday, July 26, 2011

How to install vista and windows 7 OS using pen drives(Removable hdd)

 
  In my previous post we discussed about installing Windows XP using thumb drives. The post can be found here, http://delphintipz.blogspot.com/2011/07/how-to-install-xp-os-using-pendrive-or.html .

  In this post we will talk about installing Windows 7 and windows vista using thumb drives.


  To make your pen drive bootable you need to download and install the latest version of Ultra ISO , and you must have windows 7 or windows vista dvd image in .iso format. If you have a dvd with vista or Windows 7 you can make .iso image using ultra ISO...

  Open Ultra ISO application by clicking the shortcut(If you are using vista or windows 7 right click the shortcut and select run as administrator). Open your windows 7 or vista .iso dvd image through file menu of Ultra ISO.
  Once you opened the .iso image select Bootable>WriteDiskImage


  Select the USB drive you want to make it as bootable. Click format, and format the drive using ntfs partition. Then click on write to begin the process.

  Once the process is completed, you can remove the drive from your computer and start installing with that pen drive.

  Hope this helps...


                                                                                                                                    Techytips

Thursday, July 21, 2011

How to install XP OS using pendrive or removable HDD(No command prompt stuff)


  Always wanted to install OS using thumb drives. Just thought of sharing the procedure to install XP os using a pen drive.

  This post will help you to do that.

  The first step is to download a free application called WinSetupFromUSB_0-2-3 from any one of below link...

Server1
server2

Then install the application in your computer. Open the application (If you are using vista or windows 7 right click the shortcut and select run as administrator). This application can be used for 2003 server as well.


Read the warning message, You must not use FAT16 file system on thumb drives greater that 2 gb. Also if you format the drive using ntfs the installation time will be less.


   If you have xp CD, copy the content of that CD to a separate folder, and select that folder as your windows xp source.

   Select the usb drive you want to make it bootable if you plugged more than one usb drive.

   Don't touch the remaining things. Click go. Wait for it to complete.

  That's it. You are ready to go. Use the pen drive to install os.

    Hope this helps..

                                                                                                                                         Techytips

Monday, January 10, 2011

HOW TO RUN DANGEROUS DAVE AND OLD DOS GAME IN LATER VERSION OF WINDOWS(AFTER XP) "EX SHOWN HERE WIN 7 64 BIT"

STEP 1: DOWNLOAD DOS BOX (VER 0.74) http://www.dosbox.com/download.php?main=1 AND INSTALL. CLICK HERE TO DOWNLOAD FROM RAPIDSHARE


STEP 2 : DOWNLOAD DANGEROUS DAVE http://www.acid-play.com/download/dangerous-dave AND EXTRACT TO A FOLDER C:\DOS...

                CLICK HERE TO DOWNLOAD FROM RAPIDSHARE


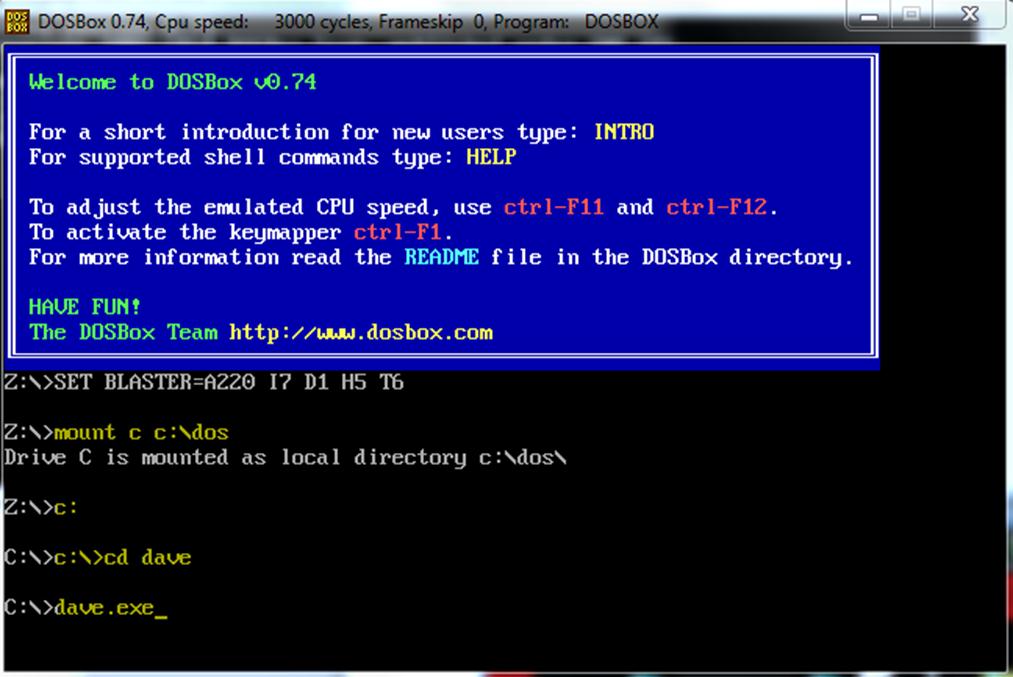
STEP 3: RUN THE DOS BOX AND TYPE THE BELOW
                mount c c:\dos
                c:
                c:\>cd dave
    dave.exe
    PRESS ALT+ENTER FOR FULLSC REEN


Hope this helps..

                                                                                                                      Techytips

Friday, January 7, 2011

How to install printers in vista and windows7 without admin privileges. Allowin standard user to install printers in vista and windows 7 computers.


      In this article we will talk about installing a network printer shared by a print server in a computer without providing local administrator credential in a domain environment.

     By configuring Point and print restriction in group policy settings we can allow a standard user to install printers in a vista or windows computer.

Let see that....

   One of my friend approached me as he is unable to install printers, shared through print server on a windows 7 computer with standard user rights. I helped him to get out of that. I though it would be good if I share those steps with you..

  The point and print Restriction can be configure locally for each and every machine or can be controlled globally through group policy management console in a domain environment.


   To configure it, Open group policy editor, and expand Computer configuration > Administrative templates and select Printers.

   In the right pane double click on Point and print restrictions, set it as enabled and select the option as in the image.


   Once it's been set in Computer configuration, Expand User configuration > Administartive templates > Control panel > Printers.
      
  In the right pane double click on Point and print restrictions, set it as enabled and select the option as in the image.


   Once you are done. Close the group policy editor refresh group policy settings and try to  install the printer. There won't be a flaw..

   Hope this helps...

                                                                                                                                   Techytips

Thursday, December 23, 2010

How to recover a permanently deleted file or folder instantly; Free delteed file recovery software


In this article we will talk about recovering a deleted file or folder in your computer instantly free of cost. While googling i found this valuable tool which helps us to recover files instantly. I though i must share that here.

Download the software Restoration from here , extract the content and copy the folder to a place which is convenient to you like on your desktop.

That's it you can now start recovering deleted files or folders through that software.

To recover a file or folder open the restoration.exe which is located inside the folder, by double clicking on it. If you use vista or windows 7 right click on the restoration.exe and select run as administrator .


Select the drive from which you deleted that particular file or folder.

Type the name of the folder or file if you are sure about it.

Then click search deleted files to start the scan through the drive.


After the scan is completed it will list all the files deleted recently. Select the file or folder you want to recover and click restore by copying.

Save the recovered items in a separate drive.


Hope this helps.

                                                                                                                                        Techytips

Wednesday, December 1, 2010

Windows 7 32 bit driver for dell inspiron N4010 (Inspiran 14R) laptop, How to find and install correct versions of drivers if you are unable to find it from official site

      A friend of mine purchased a dell inspiron n4010 with windows 7 64 bit version. he never attached to 64 bit versions. he planned to change his Os as he is having 32 bit windows 7 DVD.

       He installed 32 bit version and struck up with the drivers. In dell website he was unable to find 32 version of drivers as they only provide 64 bit versions. He tried his level best in searching and he approached me. With a workaround we succeeded in  installing the drivers. Finally i realize for a normal user it's quite difficult to get the drivers. So I thought of sharing the workaround in my blog. Let see that...


WORKAROUND

1. At first browse the available driver set for that particular laptop, in it's website.

2. Note down the hardware manufacturer and versions (like realtec gigabyte ethernet adapter, intel wimax link 6260, ATI mobility radeon hd 550v,  etc)

3. Download and install the driver version you required from the hardware manufacturer website. In the hardware manufacturer's website driver version's compatible with all os may available.

4. For example, Your Dell laptop is having intel wimax 6260 adapter and in dell official website 32 bit version driver is not available for download, you should go to Intel website and download the right version of driver for intel wimax 6260 adapter which should be compatible with your Os.

     This procedure will work for all laptops to find and install correct versions of drivers if you are unable to find it from laptop's official website. But in this case we will do it for Dell inspiron n4010.

    As an example, we are going to find and install 32 bit wireless network adapter driver for Inspiron N4010 laptop. Go to http://supportapj.dell.com/support/downloads/index.aspx?c=in&cs=indhs1&l=en&s=dhs&~ck=mn and select your laptop model as Inspiron N4010. Chose your operating system as windows 7 64 bit, Click find downloads. This will list all the drivers available for N4010 laptop compatible with windows 7 64 bit.


In the available drivers list expand network and note down the adapter's commercial name.

Then go to, http://downloadcenter.intel.com/ and select wireless Networking > Intel wimax Adapters > intel wimax 6260 and then select your operating system. Download the drivers install it enjoy.


Like the same way you could find and install drivers for display adapter, Ethernet adapter, Sound drivers etc.. for all the laptops

Hope this helps.

                                                                                                                                Techytips

Saturday, November 27, 2010

How to recover a deleted subfolder from .pst (outlook personnel folder) file


         We have lot's and lot's good software available in the internet to recover a deleted file. But none of them is going to help you if you delete a sub folder or a bunch of mails from a personnel folder (.PST) in outlook. If you delete the whole folder you can retrieve it with the help of some recovery software but you cannot if you permanently delete a subfolder from .PST file.


        But there are some things we can do and make our self proud  to recover a deleted subfolder or a bunch of mails from .PST (outlook personnel folder) file free of cost. Let's see that...


We are going to divide the whole procedure into three steps.

1. Make a copy of the original .pst file.

2. Edit the binary information in the file and make it corrupted

3. recover the deleted subfolder by using a Microsoft tool

In the first part you are going to make a copy of the .pst file. Say you deleted a subfolder from a personnel folder and you are ready to recover the.

Now we are going to edit the binary information of the .pst file to make it corrupted.  Download hex edit neo and install it in your computer. Open the .pst file through hex edit neo and edit the values to 00 for 5-6 lines  starting from 0000002. Do not edit the information at the line before 000020 as it will completely destroy the .pst file.


Save and close it. Now you did corrupt the pst file.

Now go to c:\program files\Microsoft office\ office 14 and double click on scanpst.exe, browse the location of the pst file and select start.


Once the checking is completed remove the check mark from make a backup and select repair. That's it, you are done. Wait for 2 minutes the process will be completed.

Link the recovered pst file to your outlook and you will find the deleted subfolder inside deleted items folder.

Hope this article helps.

                                                                                                                            Techytips

Thursday, November 25, 2010

How to uninstall internet explorer 9 (ie9) beta version installed through windows updates


Hey all, In this post we will talk about uninstalling removing internet explorer 9 beta version which is installed through windows update.

Yes, browsing with ie9 beta is full of hangs and crashes. Microsoft shouldn't have done that, installing ie9 without user's notice as automatic windows update.  Okay let's talk about uninstalling that...


1.  Go to control panel > Classic view > Programs and features.


2. In the program and features windows, click on View installed updates.


3. In the update history window find "windows internet explorer 9" right click on that, and click uninstall. it will start uninstalling ie9 beta.


4. Once the uninstall is over, restart your computer. You will be having internet explorer 8.

Hope this helps.

                                                                                                                                   Techytips

Monday, November 22, 2010

How to get more battery backup and increase your laptop's battery's life


Do you want to have a handsome hours of your laptop's battery backup?

Everybody prefers to work with laptop, even I do with the Conveniences offered by laptops. We can carry it to anywhere, literally anywhere..

But If your laptop's battery backup is less, You are stumped. But in this article we will talk about the instruction you need to follow to have a reasonably good battery backup and life.. 

Let's talk about that....


COMPLETE CYCLES

       You need to use your battery with complete cycles. Always allow your battery to discharge it self to 5-10 percent, then charge it to 100 percent. You can do this by removing laptop charger when you battery is 100 percent put that back when your battery level is 10 percent. By following this method your battery's ability to stand will increase. Discharge your battery at least twice in a week.

DON'T CLOSE THE LID

      Don't close your laptop's lid while it's shutting down or it's in use. By default if you close your laptop's lid at any time, your laptop will go to standby mode and this will consume some power from your battery. This will reduce the ability of your battery. so close your laptop's lid only after shutting it down.

POWER SETTINGS

     If your laptop is on battery change the power plan to power saver. If you select power saver as power plan, power distributed to peripherals like USb ports, WIFI adapters will be reduced and thus you will get more battery backup. In addition to that animation and transparency will be disabled if choose power saver.

SCREEN BRIGHTNESS

      Reduce your screen brightness while you are working on battery.  If you do so your battery backup time will considerably increase. So make sure you decrease the brightness while working on battery.

REMOVE UNWANTED PROGRAMS

     If any unwanted programs are running in background those program will consume power. So we could get more backup time by disabling those programs. You can disable unwanted services and startup programs with the procedure explained here . Check the services and startup portion.

USE WINDOWS 7

    Windows 7 has improved power saving qualities. So if you use windows 7 there is much chance to get more battery backup.


Hope this post help you increase your battery backup time..

                                                                                                                          Techytips

Saturday, November 20, 2010

Dell latitude E6510 cursor jumps while typing something (Sollution)

     I recently came across a problem with dell latitude E6510 laptop. when I drafting a mail or typing something urgently the cursor jumps to random location and creates a hell a lot of mess, which leads me in typing those from scratch. My laptop is a dell latitude E6510 came with windows 7 professional, I installed windows 7 ultimate as i don't like the way it looks.

     When I felt the random cursor jumps, I did suspect the touch pad and  reduced it's sensitivity through control panel.Then I told my self that I set it right, everything will be alright. But for my surprise there is no change in the behavior, the cursor still jumps and i was stumped.


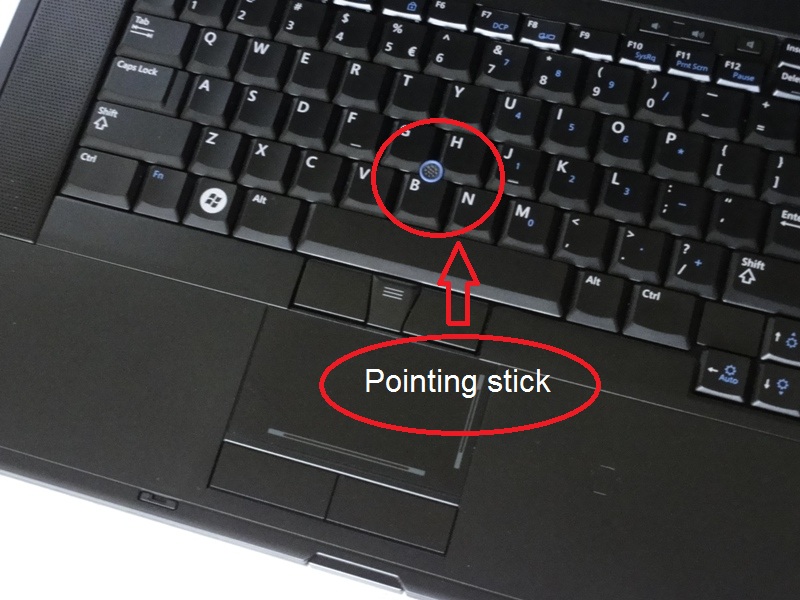
But after a small research I realized that the cause of the problem is not because of touch pad and it's due to POINTING STICK (rubber head ) which dell equipped for the lovers of Pointing stick. I found that when i typing something my fingers touch that pointing stick, that causes the cursor to move somewhere It should not and to disable it is the only solution.

We can easily disable it with Dell touch pad application...


To do that, Go to control panel, change the view to small icons, and double click on Mouse to launch mouse properties window or you can simply type Mouse in the windows 7 search  bar and select mouse in the results.


In the mouse properties window, Click on Dell touch pad tab to launch the application. Once the application launched Click on Device select, In the device select windows click to disable Pointing stick and pointing stick buttons. or you can select disable touch pad/pointing stick when a usb mouse is present if you are using an external mouse.


Click apply, Ok. That's it. You're done. You disabled pointing stick and The cursor will not jump unexpectedly.. feel free to post back the results.


Hope this article will help you. Also have a look here to increase your battery backup


                                                                                                                                 Techytips

Tuesday, November 16, 2010

How to configure Homegroup to share files and printers in Windows 7


Homegroup, Introduced by Microsoft in windows 7, is the easier and secure way to share files, printers, documents, media, libraries..

But getting it to working state is a bit difficult for normal users without prior experience. In this article we will talk about Microsoft Homegroup and will guide you to configure it and master it..

Let's see that...


HOMEGROUP

       Ever frustrated to use pendrive or e-mail to transfer documents to other computer which is located at next room so that you can print them? Ridiculous, isn't it?  We can eliminate these, if we can share documents and printers between them.. Microsoft made it easier and secure to share printers, files,media, libraries and documents through homegroup. Homegroup is like logical boundary of computers connected together. You can decide what gets shared and what stays private.


HOW TO CONFIGURE

              Setting up a homegroup is not a big deal with the information provided here. You need to create a homegroup from any one of your computer and add other computers to that home group.
To create a home group, Go to control panel and select Chose home group and sharing option below network and internet and at the home group window, click Create a homegroup.


  select your preference to share and click next. Copy and paste the password to a notepad and save the text file on your desktop, so that we can use the password to join other computers. Congrats now you have created a home group.


To add other computers to Homegroup you created now,  Login to the computer, Go to control panel and select Chose home group and sharing option below network and internet and at the home group window, click on join now, select which you want to share, type Homegroup password from the text file and click finish.

That's it. You are done. If you have more than two computer's you can add them to homegroup using the above procedure. From each computers you can view other computers documents.


If any one of the computer connected to printer, all the computers can use the printer.

I hope this post will help you to configure HOMEGROUP and share files and printers securely..


                                                                                                                             Techytips

Wednesday, November 10, 2010

Scan your pc for virus through internet by windows live one care :) free of cost


Hey friends, we had a discussion about how to safe guard your computer from virus even if you don't have an antivirus software in this post. In addition to that we can also utilize the Windows live one care to scan your computer for virus through internet free of cost.
Windows live one care is a free and powerful tool provided by Microsoft to ensure Windows 7 and Windows vista stability. Let see how do we configure and utilize it.

    To use One care you need to visit this site http://onecare.live.com/site/en-us/default.htm through the latest version of internet explorer. This product will only work through internet explorer, and Microsoft wants that.

    The full service scan consists of Protection which will check your computer for security threats, Cleanup which will clean the junks from your hard drive, and Tune up which will increase your computer's performance.This tool can be used only on vista and and windows 7 Os.  
We cannot use this tool on Windows xp.

    Before starting, open internet explorer and turn off pop-up blocker The procedure can be found here.In the One care home page, click on full service scan and click on launch full scan for windows vista and windows 7 to initiate the process and Click the install now button in the next page. Internet explorer will ask you install the add on, Right click on the yellow ribbon below file menu and select install this add on for all the users in this computer. The below image may assist you to find the yellow ribbon.


 Click Launch scanner button, select complete scan and click next in the pop up window.

Once you click next, It will initiate the download process wait until it's completed.


   Once the download completed it will start the scan, It may take an hour or two. Wait until the scan completed, it will clear your junk and will tune your computer for better performance.

do it at least Once a week and you don't need an antivirus software. I hope this article will help you. Don't forget to post comments.

                                                                                                                                       Techytips

Twitter Delicious Facebook Digg Stumbleupon Favorites More

 
Design by Free WordPress Themes | Bloggerized by Lasantha - Premium Blogger Themes | Bluehost Coupons