Showing posts with label ConfigMgr. Show all posts

Friday, April 29, 2016

Migrating to ConfigMgr Current Branch - Moving SUP (WSUS) to server 2012 R2

Hey guys. This is the second post in the series "Migrating to ConfigMgr Current Branch". In my first post we talked about moving MP to a server 2012 R2 and in this post we will talk about moving SUP to server 2012 R2. I wanted to index all the posts in this series to make the navigation easy for you guys.. Here it is

Migrating to ConfigMgr Current Branch

1.Migrating to ConfigMgr Current Branch - Migrating MP to server 2012 R2

2.Migrating to ConfigMgr Current Branch - Moving SUP (WSUS) to server 2012 R2


 Lets get into this,  The ConfigMgr 2012 instance I support has 2 SUP role instance on 2 different servers. Both the WSUS instances on the SUP's shares same SQL DB which resides under ConfigMgr DB instance and WSUS shared Content share which is hosted in a file share. Since both of WSUS uses same DB & Content share, and I really cant touch the DB as it is prod instance, I had to take the below approach to complete this task.

(new server 2012 R2 servers will be called sup2012_1 and sup2012_2  from now on in this post)

  • Install WSUS with WID (Windows internal Database) in sup2012_1
  • Detach the WID DB from sup2012_1 and attach it with ConfigMgr SQL instance with name different than default SUSDB(In my case, I had that named as SUSDB_<SiteCode>)
  • Configure sup2012_1 to use attached sql database
  • Install WSUS in sup2012_2 and configure to use the same DB and Content share used by sup2012_1
  • Configure SUP role in both sup2012 servers and initiate WSUS sync.
  • Perform functionality and availability tests
  • remove SUP role from server 2008 R2
Lets see each phase in detail.

Install WSUS with WID (Windows Internal database) in sup2012_1

  • Login to the server sup2012_1 and make sure firewall is turned off or necessary firewall rules are created allowing siteserver and sup2012_1 to communicate
  • Add the computer account of site server as a local admin in sup2012_1
  • If you have additional drive to install ConfigMgr component and don't want SCCM to get installed in C drive, create NO_SMS_ON_DRIVE.SMS in the root of C drive, so that the drive will be untouched.
  • Create a Share folder in a file share for WSUS content and add provide full control for everyone. (\\FileServer\ShareFolder)
  • Open an elevated PowerShell Console and execute the below command to install WSUS and required IIS features
Install-WindowsFeature -Name UpdateServices -IncludeManagementTools
  • Once the command completed successfully (Ignore the warning message about post installation configuration) execute the below command to perform post installation configurations
 "C:\Program Files\Update Services\Tools\wsusutil.exe" postinstall CONTENT_DIR="\\FileServer\ShareFolder"
  • After the post installation configurations are completed,  Launch IIS management console and navigate to Sites->WSUS Administration, right click on Content, select Manage Virtual directory and select Advance settings.
  • In the advance setting properties, Make sure Physical path starts with "\\", If not add as seen in the below screenshot


  •  Restart W3SVC and WSUS services
  • Launch WSUS administration console to make sure that the console launches without any error.(DO NOT CHANGE ANY CONFIGURATIONS THROUGH CONSOLE)

 Migrate from WID to Remote SQL (Server 2012 WSUS)
  • Download Microsoft ODBC Driver 11 for SQL Server and SQLCMD from the below links respectively.
https://www.microsoft.com/en-us/download/details.aspx?id=36434 
https://www.microsoft.com/en-us/download/details.aspx?id=36433
  • Install ODBC driver followed by SQLCMD in sup2012_1 server by following installation wizards 
  • stop W3SVC and WSUS services
  • open elevated command prompt and execute following commands to provision and detach WSUS DB from WID
sqlcmd -S \\.\pipe\MICROSOFT##WID\tsql\query
use master
alter database SUSDB set single_user with rollback immediate
go
sp_detach_db SUSDB
go
  • Once the above step completed successfully, Navigate to C:\Windows\WID\Data and copy the susdb.mdf to a shared location.
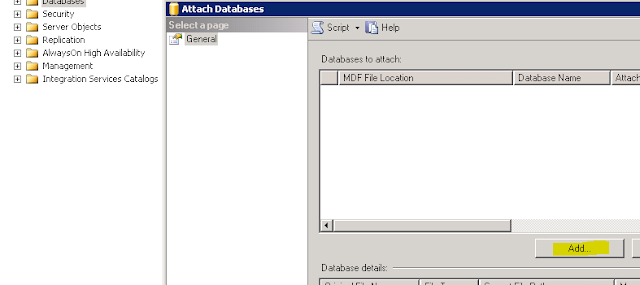
  • Login to SQL server where your existing SUSDB is hosted, Launch SSMS (SQL server management studio), connect to DB instance and attach the copied susdb.mdf file with name SUSDB_<SiteCode> by going through attach DB wizard
  • Once the DB is successfully attached, Login to SUP server(sup2012_1) with admin privileges, Navigate to HKLM\SOFTWARE\Microsoft\UpdateServices\Server\Setup in registry editor and change the values as shown below
SQLServerName: <SQL server Name>\<Instance Name>
SqlDatabaseName: SUSDB_<SiteCode>
ContentDir: \\FileServer\ShareFolder
  • Start W3SVC and WSUS service
  • Laucn WSUS admin console to make sure it is able to connect to DB

Install and Configure WSUS in sup2012_2(Replication Partner)

  • Login to the server sup2012_2 and make sure firewall is turned off or necessary firewall rules are created allowing siteserver and sup2012_2 to communicate
  • Add the computer account of site server as a local admin in sup2012_2
  • If you have additional drive to install ConfigMgr component and don't want SCCM to get installed in C drive, create NO_SMS_ON_DRIVE.SMS in the root of C drive, so that the drive will be untouched.
  • Open an elevated Powershell Console and execute the below command to install WSUS and required IIS features (Without DB)
install-windowsfeature -name updateservices-services -includemanagementtools
  • Open registry editor, navigate to  HKLM\SOFTWARE\Microsoft\UpdateServices\Server\Setup and change the values as shown below
    SQLServerName: <SQL server Name>\<Instance Name>
    SqlDatabaseName: SUSDB_<SiteCode>
    ContentDir: \\FileServer\ShareFolder
( Exact same values as in sup2012_1 server)
  • In elevated PowerShell console execute below command to perform post installation configurations
 "C:\Program Files\Update Services\Tools\wsusutil.exe" postinstall CONTENT_DIR="\\FileServer\ShareFolder"
  • Once the post installation configurations are completed,  Launch IIS management console and navigate to Sites->WSUS Administration, right click on Content, select Manage Virtual directory and select Advance settings.
  • In the advance setting properties, Make sure Physical path starts with "\\", If not add as seen in the below screenshot


  • Restart W3SVC and WSUS services.
  • Launch WSUS administration console to make sure that the console launches without any error.(DO NOT CHANGE ANY CONFIGURATIONS THROUGH CONSOLE)


Install SUP role in both servers (sup2012_1 & sup2012_2)


  • Connect to ConfigMgr site through PowerShell, by selecting "Connect via Windows PowerShell" from Console file menu

  • Execute the below power shell command to add server2012 as a sitesystem in your ConfigMgr site (If they are not already)
New-CMSiteSystemServer -ServerName "sup2012_1.<DomainName>.<Com>"  -SiteCode "<SiteCode>"
  • On successful completion of the above, execute the below power shell command to add sup2012_1 as a SUP
Add-CMSoftwareUpdatePoint -SiteSystemServerName  "sup2012_1.<DomainName>.<Com>"  -SiteCode "<SiteCode>" -ClientConnectionType Intranet -WsusiisPort "8530" -WsusiissslPort "8531" -Verbose
  • Go through supsetup.log in the installation directory and make sure the SUP installation succeeded.
  • Once the installation succeeded, Navigate to \Administration\Overview\Site Configuration\Servers and Site System Roles in ConfigMgr console, select sup2012_1, right click on SUP role to see the properties. Make sure all the options you need are selected and configured.
  • Go through wcm.log in site server and make sure the configuration completed without any errors. But if you happen to receive the below error in WCM, it can safely be ignored as this is known behaviour in ConfigMgr 2012 R2 SP2
Failed to create assembly name object for Microsoft.UpdateServices.Administration. Error = 0x80131701.    SMS_WSUS_CONFIGURATION_MANAGER    29.04.2016 09:09:07    11840 (0x2E40)
  • Once all are green, initiate an update sync in ConfigMgr console and observe the outcome.
  • Follow the above procedure to install SUP role in sup2012_2 and initiate a sync to make sure everything is Ok.

Known Errors

In this section we will talk about known errors while configuring a server 2012 R2 as SUP in ConfigMgr environment

Error1 - WSUS app pool crash

 When you configure a server 2012 R2 WSUS as ConfigMgr SUP,  WSUS app will crash while the clients starts using that SUP and The console will not connect WSUS with the below messages in event viewer.

Event ID:      12052
Task Category: 9
Level:         Error
Description:
The DSS Authentication Web Service is not working.

Event ID:      12042
Task Category: 9
Level:         Error
Description:
The SimpleAuth Web Service is not working.

Event ID:      12022
Task Category: 9
Level:         Error
Description:
The Client Web Service is not working.

Event ID:      12032
Task Category: 9
Level:         Error
Description:
The Server Synchronization Web Service is not working.

Event ID:      12012
Task Category: 9
Level:         Error
Description:
The API Remoting Web Service is not working.

Event ID:      12002
Task Category: 9
Level:         Error
The Reporting Web Service is not working.

Event ID:      13042
Task Category: 6
Level:         Error
Description:
Self-update is not working.

Fix

To fix we need to change certain values at the IIS level for WSUS website. To do that,
  • Launch IIS management console, Navigate to Application Pools, Right click on WSUS Pool and go to advance properties.
  •  In the advance settings properties change the Queue length to 50000 as shown in the below screenshot
 

  • After doing this change, restart W3SVC and WSUS services.

 Functionality & Availability tests

  • Launch ConfigMgr Admin console Navigate to Monitoring\Overview\Software Update Point Synchronization Status to verify that the newly Installed SUP synchronize without any issues
  • Additionally go through wsusctrl.log, wcm.log, wsyncmgr.log to make sure that there are no errors in SUP operations
  • Identify a group of test clients and make them report to newly installed SUP by changing local group polcy configuration. Launch gpedit.msc, navigate to Computer Configuration -> Administrative templates -> Windows Components -> Windows Update. Edit the policy "Specify intranet Microsoft Update service location" to type in your server name as in the below image.

  • Create a test Update group, Deployment package and deployment to make sure the test clients successfully complete the scan against newly installed SUP, download the content, Install the updates and perform post validation scans.
Remove server 2012 R2 SUP

 This is pretty much straight forward. The upstream SUP must be removed at last after all of it's downstream SUPs are removed.
  • Login to siteserver, In Admin console navigate to Administration\Overview\Site Configuration\Servers and Site System Roles, select the server 2008 R2 SUP in the right pane
  • Right click on the Software Update point role, and click on Remove Role
(While removing the upstream SUP it will ask you select new upstream server. From the drop down menu, select one of newly installed SUPs )
  • Supsetup.log to verify successful De-installation SUP role
  • Navigate to Administration\Overview\Site Configuration\Servers and Site System Roles, right client on the server 2008 r2 site system and select Delete.

 Hope this post would help you when you plan to move your SUP role from server 2008 R2 to server 2012 R2. I know this is a lengthy post and I tried my level best to explain without including too much screenshots.If you have any questions or suggestion, Please leave a comment. i will try to answer them. :-)

S A Delphin

Thursday, April 21, 2016

Migrating to ConfigMgr Current Branch - Migrating MP to server 2012 R2

Hey guys.. Glad to meet all of you with another series (Migrating to ConfigMgr CB). In my client's environment we fixed ConfigMgr 1602 as the version to be migrated to and currently we are preparing our infrastructure by replacing server 2008 R2 site systems with server 2012 R2 and performing compatibility & stability tests in ConfigMgr 1602 test environment in parallel. As explained in one of my previous posts, ConfigMgr CB will not support server 2008 R2 servers as site systems / site servers after this December. More details here
Did you know that you should breakup with server 2008 R2

Meanwhile some of my friends approached me asking my suggestion on the migration to ConfigMgr CB in the infrastructure they support. So, I thought it would be really cool if I can write a blog series on that. here I am, this series will have detailed procedure to migrate all the site systems (MP, DP, SUP, RP etc) to server 2012 R2 as preparing to ConfigMgr CB upgrade and I will share all the issues and experience I came across in my infrastructure. Without further adu, lets get started.

Migrating MP to server 2012 R2

 I wouldn't call this a migration but introducing new server 2012 MP and removing old one. The Plan is as follows

  1. Prepare server 2012 R2 server
  2. Install MP on server 2012 R2
  3. Make sure it works and Remove the traces of Server 2008 R2 MP in deployment objects
  4. Remove MP role from Server 2008 R2 servers

lets see those steps in detail

Prepare server 2012 R2 server (server2012)

  1. Make sure firewall is turned off or necessary firewall rules are created allowing siteserver and server2012 to communicate
  2. Add the computer account of site server as a local admin in Server2012
  3. If you have additional drive to install ConfigMgr component and don't want SCCM to get installed in C drive, create NO_SMS_ON_DRIVE.SMS in the root of C drive, so that the drive will be untouched.
  4. Install below server components which are mandatory for ConfigMgr MP
- .NET Framework 4
- BITS Server Extensions (and auto selected options)
- IIS
   Application Development >> ISAPI Extensions
   Security >> Windows Authentication
   IIS 6 Management Compatibility >> IIS 6 Metabase Compatibility
   IIS 6 Management Compatibility >> IIS 6 WMI Compatibility
      5. Restart the server2012 as needed
     6. Navigate to DotNet install location (By default it's C:\Windows\Microsoft.NET\Framework64\v4.0.XXXXX), edit the files regsvcs.exe.config ando InstallUtil.exe.cnfig to add the below lines right after </startup>

<runtime>     
    <loadFromRemoteSources enabled="true"/>
</runtime>
 and the  file should look like the following screenshot


If you do not do this, the BGB component installation in server2012 will keep failing with a DotNet Error

 Install MP role in Server2012
  • Connect to ConfigMgr site through PowerShell, by selecting "Connect via Windows PowerShell" from Console file menu
  •   Execute the below power shell command to add server2012 as a sitesystem in your ConfigMgr site
New-CMSiteSystemServer -ServerName "Server2012.<DomainName>.<Com>"  -SiteCode "<SiteCode>"
  • On successful completion of the above, execute the below power shell command to add server2012 as a MP
Add-CMManagementPoint –SiteSystemServerName "Server2012.<DomainName>.<Com>" –SiteCode "<SiteCode>"
  •  Go through MPcontrol.log in the installation directory and make sure the MP installation succeeded.
  • Once the installation succeeded, Navigate to \Administration\Overview\Site Configuration\Servers and Site System Roles in ConfigMgr console, select the new site system, right click on MP role to see the properties. Make sure all the options you need are selected and configured.
Post Configuration
  • Go through mpcontrol.log to confirm that the newly installed MP is responding to client communications
  • Use MPcert and MPlist URL from a test client to verify that the MP is reachable to clients

http://<Site_system_name>/sms_mp/.sms_aut?mplist. 
 http://<Site_system_name>/sms_mp/.sms_aut?mpcert
  •  If you have published all your MP's in DNS, remove the old entries and add the entries for server2012 MP
  • Identify Task Sequences which uses old MP's in their ConfigMgr client installation switches and edit them to reflect the new server2012 MP
  • Make sure to remove the traces of OLD MP's from all other deployment object so that removing them will not stop anything from working.
Remove OLD MP
  • Navigate to \Administration\Overview\Site Configuration\Servers and Site System Roles in ConfigMgr console, select server 2008 site system which hosts MP role, right click on MP role and select remove.
  • Monitor mpsetup.log to ensure successful removal of MP.
That's all you need to do, If you have MP's with replicated DB for special requirements, build server2012 MP in the same way with different SQL DB and remove the old one.


Hope this article helps and this is the first post in the series. I will come up with a post which explains  Upgrading your SUP while you have 2008 R2 replicated WSUS which uses same DB instance as SUP's.

Complete index of this series,

1.Migrating to ConfigMgr Current Branch - Migrating MP to server 2012 R2

2.Migrating to ConfigMgr Current Branch - Moving SUP (WSUS) to server 2012 R2

S A Delphin

Friday, September 18, 2015

What's New in ConfigMgr VNEXT - TP3 - SUP Model


Hey guys.  Its time for the second part of the series What's New in ConfigMgr VNEXT - TP3. read the first part here

http://delphintipz.blogspot.in/2015/09/whats-new-in-configmgr-vnext-tp3.html


 This time its about the SUP model in ConfigMgr vNext TP3. I was able to spend some time to work with SUP model and there are some interesting stuff. Those will eventually off load the engineers who do patching. The below are the changes / Enhancements I have noticed in vNext

  1. WSUS cleanup can be done from within ConfigMgr console
  2. Templates for ADR
  3. ADR supports multiple deployments

1. WSUS cleanup
 In vNext,We have the option to schedule WSUS cleanup with a configured interval. This is actually kind of a good approach to deal with the Expired or orphaned content within WSUS and we all should be happy that Microsoft is at least trying to help us, But changing the way ConfigMgr client scans against the SUP would be the solution.


As seen in the screenshot, the option can be selected while installing the SUP and by default the interval at which the cleanup runs is 30 days.
The same can be seen in the wsyncmgr.log

Setting sync alert to active state on site DLP    SMS_WSUS_SYNC_MANAGER    9/15/2015 11:11:38 AM    3824 (0x0EF0)
Sync time: 0d00h00m19s    SMS_WSUS_SYNC_MANAGER    9/15/2015 11:11:38 AM    3824 (0x0EF0)
Skipping Delete Expired Update relations since this is not a scheduled sync.    SMS_WSUS_SYNC_MANAGER    9/15/2015 11:11:38 AM    3824 (0x0EF0)
WSUS Cleanup wizard interval is : 30 days and time since last WSUS Clean wizard run is 16693 days. Calling WSUS Cleanup wizard.    SMS_WSUS_SYNC_MANAGER    9/15/2015 11:11:38 AM    3824 (0x0EF0)
Successfully completed WSUS Cleanup wizard.    SMS_WSUS_SYNC_MANAGER    9/15/2015 11:11:41 AM    3824 (0x0EF0)
Next scheduled sync is a retry sync at 9/15/2015 12:11:38 PM    SMS_WSUS_SYNC_MANAGER    9/15/2015 11:11:41 AM    3824 (0x0EF0)
 As this just is equivalent to launching the WSUS cleanup wizard from WSUS console, we need to take care of the superseded updates as we do in ConfigMgr 2012.

2. ADR Templates

Another interesting thing in vNext SUP model is that there are Pre-configured templates for ADR. This is not a quite a big improvement but we could see that Microsoft is trying to off load the engineers. We have 3 templates available by default, each one with different search criteria and custom schedule as the ADR rule.

  1. Definition Updates
  2. Patch Tuesday
  3. CAMP Updates


Patch Tuesday

 Search Criteria : Update classification - Critical and Date revised
 Schedule           : Once in 30 days                                     


Definition Updates

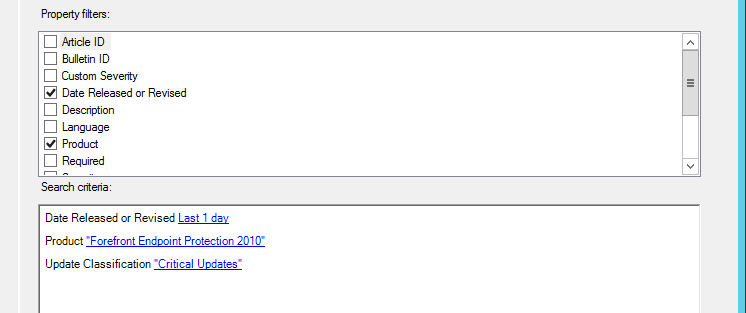
Search Criteria : Definition updates for FEP / WIN Defeneder
Schedule           : Run the rule after any SUP synchronization


CAMP updates

Search Criteria : Critical updates for FEP
Schedule           : Once in a day


3. Multiple deployment in ADR

 In ConfigMgr 2012 we can have only one deployment for an ADR. If you want to differ in the deployment time or user notification etc.. for some clients, you actually need to create a new ADR.

But in vNext you don't have to create a new ADR. You can just keep on adding new deployments with different schedule, collection, user notification etc.. to an existing ADR. Cool isn't it ?.

The below screenshots illustrate how we can add multiple deployments for an ADR


With all these, there isn't a huge change in SUP model of Configmgr vNext yet, but there are things which can actually reduce some of the loads on the engineer..

Hope you enjoyed this !                                                                                               S A Delphin


Tuesday, September 15, 2015

What's New in ConfigMgr VNEXT - TP3 - Introduction

Hey Guys. I am happy to meet you all with another post, only this time it is gonna be a series of posts about "What's new in ConfigMgr Vnext - TP3"

As you all know that ConfigMgr vNext TP3 is made available by Microsoft on 19-Aug-2015 and I got a chance to evaluate the functionality in my LAB. This series of blog post will talk about the features and functionality introduced or changed in vNext. Hope you guys will enjoy this series.

New Features / Enhancements in ConfigMgr vNext

 The listed below are the improvements in vNext technical preview 3, collected from Technet.

  • Windows 10 in-place upgrade
  • Mobile Application Management
  • Data protection for mobile devices
  • Preferred management points
  • On-premises mobile device management (MDM)
  • Support for Microsoft Azure virtual machines
  • Client deployment status in console monitoring
  • Sideloading apps in Windows 10
  • Windows PE Peer Cache
  • On-premises MDM: Adds support for Windows 10 desktop
  • Bulk enrollment of Windows 10 devices
  • Support for multiple Automatic Deployment Rules
  • Diagnostics and Usage Data
  • Service a server cluster
  • Support for SQL Server AlwaysOn for highly available databases
  • Deploy Windows Business Store applications
  • App deployment to Windows 10 devices with on-premises MDM
  • Compliance settings for Windows 10
  • Improved workflow for creating mobile device configuration items
  • Updates for Windows 10 in-place upgrade
  • Updates for bulk enrollment of Windows 10 devices with on-premises MDM

I will be testing every possible scenario in my LAB and share my experience with you guys in upcoming articles.

The complete detail and limitations are available in this artcile
https://technet.microsoft.com/en-us/library/dn965439.aspx

ConfigMgr vNext TP3 can be downloaded from Microsoft evaluation center
http://www.microsoft.com/en-us/evalcenter/evaluate-system-center-configuration-manager-and-endpoint-protection-technical-preview

Outlook - ConfigMgr vNext TP3

As I just completed setting up my vNext LAB, i though it would be really cool to share the outlook of the tool with you guys.

Asset and compliance


The Asset and compliance looks the same as ConfigMgr 2012 R2 SP1 other than the "Windows" folder under All Corporate-Owned devices.

 Software Library


Windows sideloading keys is new which helps "Sideloading apps in Windows 10" We will be seeing that later in detail.

 Monitoring


Production and Pre-production client deployment. Not sure how this works yet, But we will get know very shortly.

Administration


I see a new node "Update and servicing" under cloud servicing. This is most probably related to the new windows service "Configuration_Manager_Update" which is available along with the other tradition ConfigMgr windows services.

Windows Services


Along with the traditional ConfigMgr windows services, there is a new Windows service with the name "Configuration_Manager_Update" is listed under services.msc. There is a log file associated with component as well, But i am not really sure about the functionality of this at the moment.


Client settings


There is this new client setting node "Windows PE peer cache" is added to support Windows PE Peer Cache feature. This is gonna be one of the coolest feature in ConfigMgr vNext since you don't need to install a Server DP in a remote location just for the sake of OSD. Excited to test this functionality.


Hope u enjoyed this :-)                                                                                                  TechyTipz


Wednesday, August 12, 2015

Failed to create AppDomain "CM_SMS.dbo - ConfigMgr 2012 R2 console error


Hey Guys. wanted to share a issue that i have encountered today with my ConfigMgr LAB environment. When i tried launching the ConfigMgr console in the LAB today I was gifted with the below error.


As soon i got this message i checked the SmsAdminUI.log and i could see the below log snippet

[6, PID:3960][08/12/2015 13:09:20] :Transport error; failed to connect, message: 'The SMS Provider reported an error.'\r\nMicrosoft.ConfigurationManagement.ManagementProvider.WqlQueryEngine.WqlQueryException\r\nThe SMS Provider reported an error.\r\n   at Microsoft.ConfigurationManagement.ManagementProvider.WqlQueryEngine.WqlQueryResultsObject.<GetEnumerator>d__0.MoveNext()
   at Microsoft.ConfigurationManagement.ManagementProvider.WqlQueryEngine.WqlConnectionManager.Connect(String configMgrServerPath)
   at Microsoft.ConfigurationManagement.AdminConsole.SmsSiteConnectionNode.GetConnectionManagerInstance(String connectionManagerInstance)\r\nConfigMgr Error Object:
    Description = "Can't create instance of CSecuredSource for SMS_Site";
    ErrorCode = 3250653696;
 As this suggests that the SMS provider is failing to execute a WMI query i quickly connected Root\SMS\Site_LAB and tried running SELECT * FROM SMS_Site WHERE SiteCode = 'LAB'

I have got the below error message


As this was misleading i went and checked smsprov.log to see if there is any error. and in the smsprov.log i could see the below snippet

CSspQueryForObject :: Execute...            SMS Provider     12.08.2015 10:36:24         5516 (0x158C)
***  select so.ObjectTypeID, so.ObjectTypeName, CASE dbo.fnIsSiteInMaintMode() WHEN 0 THEN so.AvailableOperations ELSE dbo.fnOR(oo.BitFlag) & so.AvailableOperations END  from dbo.RBAC_SecuredObjectTypes AS so  inner join dbo.RBAC_ObjectOperations AS oo ON oo.ObjectTypeID = so.ObjectTypeID  where oo.isReadOnly = 1 AND so.ObjectTypeName = 'SMS_Site' group by so.ObjectTypeID, so.ObjectTypeName, so.AvailableOperations     SMS Provider     12.08.2015 10:36:24         5516 (0x158C)
*** [42000][6517][Microsoft][SQL Server Native Client 11.0][SQL Server]Failed to create AppDomain "CM_LAB.dbo[runtime].822". ~~Exception has been thrown by the target of an invocation.        SMS Provider                12.08.2015 10:36:24         5516 (0x158C)
*~*~[42000][6517][Microsoft][SQL Server Native Client 11.0][SQL Server]Failed to create AppDomain "CM_LAB.dbo[runtime].822". ~~Exception has been thrown by the target of an invocation.     ThreadID : 5516 , DbError: 6517 , Sev: 16~*~*        SMS Provider     12.08.2015 10:36:24         5516 (0x158C)
CSecuritySource::GetSecurityObjectEx - SQL cmd failed SMS Provider     12.08.2015 10:36:24         5516 (0x158C)
*~*~e:\nts_sccm_release\sms\siteserver\sdk_provider\smsprov\sspobjectquery.cpp(2057) : Can't create instance of CSecuredSource for SMS_Site~           SQL Error: [42000][6517][Microsoft][SQL Server Native Client 11.0][SQL Server]Failed to create AppDomain "CM_LAB.dbo[runtime].822". ~~Exception has been thrown by the target of an invocation.~*~*               SMS Provider     12.08.2015 10:36:24         5516 (0x158C)
*~*~Can't create instance of CSecuredSource for SMS_Site [42000][6517][Microsoft][SQL Server Native Client 11.0][SQL Server]Failed to create AppDomain "CM_LAB.dbo[runtime].822". ~~Exception has been thrown by the target of an invocation.~*~*      SMS Provider     12.08.2015 10:36:24         5516 (0x158C)
Execute WQL  =SELECT * FROM SMS_Site WHERE SiteCode = 'LAB'           SMS Provider     12.08.2015 10:36:24         5516 (0x158C)
 This finally gave me some convincing evidence that there is some problem with the SQL instance.

 As a first step I restarted the SQL instance (Would not be the first for most of us ) and voila the console started showing me the Asset and compliance workspace. And that saved my day.

Bottom line, to me restarted the SQL instance worked.

Hope this helps ..

                                                                                                                                S A Delphin

Twitter Delicious Facebook Digg Stumbleupon Favorites More

 
Design by Free WordPress Themes | Bloggerized by Lasantha - Premium Blogger Themes | Bluehost Coupons